Showing posts with label custom characters. Show all posts

Wednesday, August 24, 2011

Tutorial: How to Make BANG! Character Cards (Part 2)

News (9/12/11): Added in the missing step for adding in the bullet images for 3/4 life point characters.
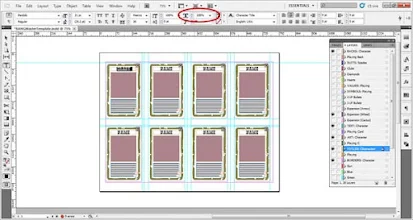
With the release of the BANG! Master Template (available for InDesign CS4-CS5), I have wanted to create tutorials that show how to use it. This guide will use the BANG! Master Template, and finish up on the first part of a tutorial that teaches how to make custom BANG! characters. Thus, before reading this tutorial, I recommend you first read the tutorials on how to create and balance a character ability, and how to create a character card image (the first part of this tutorial). STEP 1: Open up InDesign and load the BANG! Master Template. I am acting under the assumption that you have downloaded the BANG! Master Template and that you have not made any changes to it. If not, download the template or start with a blank template. Once you have loaded the file, it should look like this (at least in CS5).
STEP 2: Prep the Template for Character Cards. Make sure the Layers window is open. You should see a list of 28 layers. You should notice which layers are visible due to the eyes being present at the boxes to the far left of the layers. Scroll to the bottom. We are going to prep this character card sheet from the bottom up, making the necessarily layers visible and unnecessary ones invisible. Let's do it in this order:
  1. Turn off the "Brown" layer by clicking on the eye corresponding to that layer.
  2. Turn on the "BORDERS: Character" layer by clicking on the far left box of that layer. An eye will appear, as well as the character border.
  3. Turn off the "Playing" layer.
  4. Turn on the "TITLES: Character" layer.
  5. Turn off the "Playing C" layer.
  6. Turn on the "ART: Character" layer.
  7. Turn off the "Playing Card" layer.
  8. Turn on the "TEXT: Character" layer.
  9. Turn off the "VALUES: Playing," "Hearts," and "Playing Back" layers.
  10. Turn on the "BACKS: Character" layer.
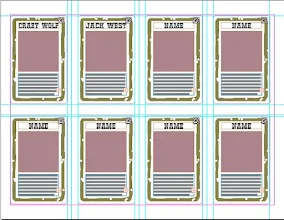
The end result (of the fronts) should be as below.
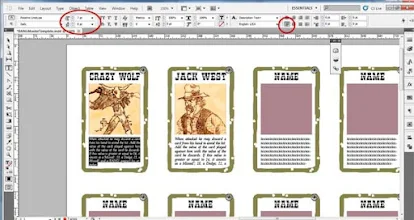
STEP 3: Add Character Name(s). Using the Selection Tool (the black looking arrow in the toolbox, shortcut "V"), double-click inside one of the text boxes entitled "NAME." Then, select all of the text (shortcut CTRL+A), and type in the name of your character. NOTE: This you should have picked out earlier; I have tips for this in step 1 of the first part of this tutorial. If the name is too long for the text box, we will have to scrunch the text. In my example, where I am trying to input "Crazy Wolf" as the name, this is the case. To scrunch the text, select all of the text in the name (CTRL+A inside the textbox again). Then, notice the long horizontal toolbar across the screen, showing typing tool options. We want to adjust the "Horizontal Scale" of the text. The option for doing this is identified by the stretched out T icon.
We want to change the value in the input box to the right. Its default value is 100%. Since our text is too long, we will want to lower that value. Click once in that text box, and then use the down arrow on your keypad to decrease its value until it fits snugly in the text box. For Crazy Wolf, I just had to adjust the Horizontal Scale to 97%. It is also possible that your name is too short (as in the case of a name like "Jack West"). The names for characters in BANG! are stretched to fit the width of the character art images, unlike the playing cards. To stretch the names, we will again use the Horizontal Scale. Instead of decreasing its value, we will increase the value. Select inside the input box with your cursor and then use the up arrow on your keypad to increase the value. For Jack West, I had to adjust the Horizontal Scale to 108% to fill the text box. The end results look like this.
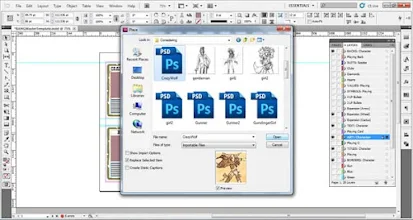
If you have more than 1 character, keep adding in names into the text boxes entitled "NAME," and adjusting the Horizontal Scales on them as needed. STEP 4: Add in Character Images. Using the Selection Tool, select one of the lavender squares undernearth one of the character cards you have named. We are now going to place in the image you created for this character card in the previous part of this tutorial. With the lavender square selected, either select from the top menu File -> Place... or use shortcut CTRL+D.
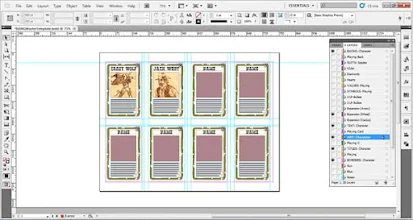
A window will appear allowing you to select an image to insert. Locate the image, select it, and then click on the highlighted "Open" button. The chosen image should replace the lavender box, but maintain its dimensions. If the image does not look proportional, then select the image and then use shortcut ALT+SHIFT+CTRL+E. This should fit the content of the image proportionally to the frame. If it still looks off, then your imported image was not square. Either fiddle with it to your liking, or edit the image in Photoshop, so that it is a square. The end results show be like this.
If you have more than 1 character, select on the next lavender box where you want to add a character image, and use the place function to add it in. Adjust the image as necessary. STEP 5: Add in Character Ability Text. Using the Selection Tool, double-click inside one of the text boxes with the long string "textextextext...." underneath one of the character cards you have named and provided an image for. Select all of the text in the box (CTRL+A), and delete it. Then replace it with the text for your character ability, which you might have designed in conjunction with this tutorial.
Next, justify the text with the last line aligned left. Do this by selecting all of the text (CTRL+A) and then clicking on the appropriate justification icon. You should notice 8 text orientation icons available amongst the long horizontal bar displaying typing tool options. You will want to click on the one in the bottom left. Afterwards, turn off the hyphenation if that is a problem. Go to Window -> Type & Tables -> Paragraph. A window should appear. In the bottom left there is a check box for hyphenation. Make sure it is empty to disable hyphenation. If the text is too long, your options are:
  1. Trim the text by getting rid of superfluous words and rephrasing statements in shorter ways.
  2. Adjust the font size. Select all of the text in the textbox (CTRL+A), and then adjust the size by clicking inside the input box for font size. This is in the tool options horizontal bar for the Typing Tool. It is identified by the small T, big T icon. Its default value should be 8. Change this to 7. Directly below that input box is an input box that alters the leading in between lines. Its default value is 9. Change that to 8. If your text still doesn't fit, consider:
  3. Extending the border of the text box a little further down. Click on the bottom border and extend it. If that doesn't work, perhaps:
  4. Make the ability simpler so that it is not as convoluted to explain.
Add in any remaining text for other characters. STEP 6: Add your Expansion Icon. By default the wagon wheel icon is in place. Feel free to use this icon as your custom expansion symbol. If you prefer another, I have provided both a cactus icon and a bow and arrow icon. Any of these icons can be swapped out by going to the layers menu, and turning on the "Expansion" layer you like. Turn off the "Expansion" layers you do not like. You may wish to make your own. If so, follow my tutorial on making your own BANG! expansion icon. If you have the icon ready, go to the layers window and select one of the "Expansion" layers, or create a new layer just below those layers. Either way, with an appropriate layer selected, place (CTRL+D) your custom expansion icon into it. Use the already provided expansion icons as guides for where to place your custom icon. If your icon is too large, simply adjust the image frame so the it is the same size as one of the provided expansion icons. Then use shortcut CTRL+ALT+SHIFT+E to resize the custom icon proportionately to the frame. Feel free to fiddle with the image frame and resizing until you get it towards something you like. If you have more than 1 card, simply copy the custom icon (select it and use shortcut CTRL+C) and paste (CTRL+V) a new one. Then move it over to the next card and put it in the appropriate place. STEP 7: Add in Life Point Bullets. For each of your characters, you should decide whether they merit having 3 or 4 life points. Typically, very powerful abilities merit 3 life points, while weaker abilities merit 4. Once this has been decided, you can add in the life point bullets by using the "3 LP Bullets" and "4 LP Bullets" layers. First, turn on the "3 LP Bullets" layer. This should make images of 3 bullets appear on each card. We only want those images to appear on the character cards that need it. To remove the others, we need to make the individual images identifiable. Do so by clicking on the right facing arrow next to the "3 LP Bullets" label in the Layers menu. This will reveal a list of 8 elements, each entitled "Bul" with a numerical ending. The number at the end of the element describes the card that it corresponds to. The guide for the numbering is provided in the image for step 8. Turn off all elements that do not correspond to a character card that has 3 LPs. In my example, only Crazy Wolf is a 3 LP character, so I will only keep the element "Bul5" visible.
Now, for the 4 LP characters if you have any. Turn on the "4 LP Bullets" label, which will make 4 bullet images appear over all of the cards. You will notice that these cover up all of the 3 bullet images that were there previously. We will need to turn off all of the elements that do not correspond to 4 LP characters. Do so in a similar manner as we did for the 3 LP images. In my example, only Jack West is a 4 LP character, so I will only keep the element "Bul6" visible. The end result is this:
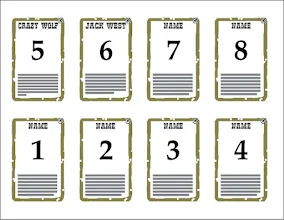
OPTIONAL STEP 8: Turn Off Unused Material. You may not fill up an entire card sheet with characters and that is fine. For printing purposes, you will not want superfluous images and texts being printed, and so we should make that stuff invisible. Let us start with the borders. In the layers window, look for the layer entitled "BORDERS: Character." There should be a right-faced arrow to the immediate left of the text label. Click on the arrow to have various layer elements appear. Each of the elements should be labeled "Char" with a 1 through 8 tacked on at the end. These numbers correspond to the 8 cards, as identified in this image:
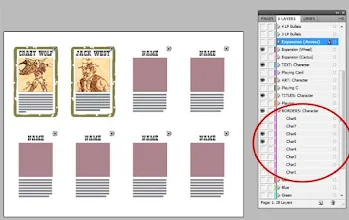
We will want to turn off all the elements named "Char" that correspond to the unused card numbers. So, in my example I want only "Char5" and "Char6" visible. The rest I should turn off. The result is this:
A similar numbering system is present in most, but not all layers. Text elements to be disabled in all layers are easily identified, since the elements all have the default names ("NAME" or "textextext..."). Turn off all of those superfluous text elements in "TITLES: Character" and "TEXT: Character." In the "ART: Character" layer, turn off all elements with the "" value. Turn off unnecessary expansion icons in your "Expansion" layer (or custom layer). All that is left is the "BACKS: Character" layer. Scroll down to the next page. Display the layer elements for "BACKS: Character" in the Layers window. While the elements have the familiar numbering system, they correspond to the backs in an inverse way as shown below:
This is needed for making sure the cards print the backs correctly on the right fronts. Just make sure the #s on the fronts you kept visible (in my example, "Char5" and "Char6" were visible) are the same ones kept visible on the backs (thus, only "CharBack 5" and "CharBack 6" should be visible). The result is:
Your card sheet should now have all superfluous material removed. STEP 9: Export your Card Sheet to PDF. Now that your card sheet's design is complete, export it to PDF. Do this by selecting File -> Export... from the top menu, or by using shortcut CTRL+E. A window will appear, where you must specify a name and location for the exported file. Click save. An "Export Adobe PDF" window should appear. Make sure the radio button "All" is selected for Pages. Under the Options area, select "Visible Layers" from the Export Layers dropdown menu. Also check the "View PDF after Exporting" box. We will now need to go to the "Compression" section. Select that label from the lefthand column.
Make sure that in the Color Images and Grayscale Images ections that the downsampling is specified as bicubic to 300 ppi for images above 300 ppi (pixels per inch). Then click on the blue highlighted "Export" button.
When it is done exporting, the PDF file should appear. Your character card sheet is now complete and ready to be printed off. If you wish to keep the design file (recommended), go back to InDesign and save the character card sheet InDesign file under a new name. This way you will have the design file for the characters if you want to make any adjustments in the future, and you will also have a clean Template to make more cards with in the future.

Friday, August 12, 2011

Robbers' Roost: Character Edits and Playtesting Request

I have reworded and adjusted the abilities of several Robbers' Roost characters. This was done to avoid confusion, as well as for balance. Here are the changes:

Lil' Sure Shot: She carries 2 guns by default (2 Colt .45), and can fire both on her turn. She can play 2 gun cards, even if they are duplicates. Once she has 2 gun cards in play, only 1 BANG! is needed to fire both.

Adjustments here make her more competitive with Willy the Kid. Willy can play any number of BANG! at distance 1 at the beginning of the game. Lil' Sure shot can do 2 at distance 1 at the beginning of the game. A gun card will increase Willy's range for all his BANG!; a gun card increases Lil' Sure Shot's range for 1 of her BANG!. However, once she has 2 gun cards, only 1 BANG! is needed to fire both her guns. Finally, to fit more thematically were Lil' Sure Shot's dual-wielding ability, I specify that she may have a duplicate gun card in front of her.

Queen Anne: She may discard 2 cards with bang! symbols to discard a card from any player she sees within distance 2.

Earlier, I adjusted her ability so that she had to discard 2 BANG!, but I have broadened it so that it applies to any 2 cards with bang! symbols. These can be from her hand or ones she has in play (green cards). So, she can use her ability slightly more often (at least without nixing all of her BANG!), but still at the expense of knocking out her fire power.

Laura Billion: After she uses a green, brown, or purple card, place the card in front of her. At the end of her turn, she may select 2 and “draw!” On royals, Laura draws the 2 into her hand at the beginning of her next turn.

Laura's ability is now optional, and the "drawing!" (like in the previous change) only occurs once (this helps balance her better against John Pain). So that she does not get an undue obscene benefit (5 cards gained by the "draw!"), I have made it so she can only receive 2 of her choice.

Porter Rockwall (previously Porter Rockwell): He may discard 2 cards to discard a BANG! or play a BANG! at any player, regardless of distance. BANG! that are played do contribute to his BANG! limit.

Simple rewording for clarity's sake.

Anne Rogers: At the start of her turn, Anne can copy the effect of a blue card in front of another player, so that it is as if she possesses its benefit. At the start of her next turn, this benefit disappears.

Anne's ability and wording was changed, so as to avoid any complications with duplicate card "possession" (if she copies a gun card, did she lose her previous weapon? What happened if she copied a Mustang and had a Mustang?). Now, she copies the effect of the blue card. This gives her some interesting stacking bonuses: she could have a Mustang in play and copy another player's Mustang to be seen by others at a distance +2. She could have a Volcanic out and copy a Winchester. Then, she could keep her Volcanic, but choose to shoot at a player she sees at distance 5. If this was done, she could only fire 1 BANG! for her turn.

Maggie Mae: If the second card she draws is royal, Maggie may swap a card she has in play for a card another has in play. Maggie must show that the second card she drew was royal immediately if she wishes to use this ability.

Mostly reworded her ability, but I wanted to point out some powerful results of her ability that I need to spell out in the guidebook. A powerful, but not obvious, consequence of her ability is how she can benefit from green and purple cards. The swapping of the cards does not mean that she steals the card and then plays it. The card garnered from swapping remains in play the whole time. This means she can swap for a green card and use it that turn. Similarly, swapping for a purple card means the immediate effect will not occur, only the latent at the beginning of her next turn. This is extremely beneficial for avoiding initial effects requiring a sacrifice, such as Investment, Loan, and Moonshine. Thus, she could hurt a player significantly by swapping out a card for 1 of those 3. She would get the highly beneficial latent effect without the initial sacrifice, and the player she swapped with still had to pay the initial cost!

Finally, there is the issue of Jack West. I had created a special ability for a character that will be used in the upcoming Czech expansion published by Albi (Valley of Shadows). I don't mind the overlap, but to make Robbers' Roost as unique as possible for all players, I thought every ability should try to be unique. As a result, I am working on a new character ability. I would like your feedback on which one you like most.

  1. The first possibility is a resistance to steals/discards. I could see this coming in 1 of 2 forms: (a) Whenever another player tries to steal or discard a card he has in play, Jack takes that card into his hand. A card is selected at random from his hand to be stolen or discarded. If the initially selected card is not chosen, it returns to play. (b) Whenever another player tries to steal or discard a card from his hand or in play, Jack chooses which card he loses. However, the chosen card must be in play if the initially selected card was in play; likewise, if the initially selected card was in his hand.

  2. Another possibility is a card disabling ability. It would run something along the lines of: "During his turn, Jack may discard 2 cards to disable any card (take it out of play). Flip the card over, so its back is showing to indicate that it is disabled. The card may be reactivated by its owner discarding 2 cards on his turn. However, Jack may reactivate his cards at no cost on his turn." Disabling is a new effect that has not been used in BANG! before. It nullifies a card temporarily, but does not remove it from its owner. However, it does take it out of play, and so a player may put in play another copy of that card. If the disabled card was reactivated, one of them would have to be discarded. Also, being out of play, the disabled card cannot be stolen or discarded. This is beneficial for Jack, since he could disable his Volcanic, and play a different gun card to reach a player further away. Also, he could prepare a backup Mustang or Barrel, in case he has one stolen/discarded.

  3. A card drawing ability: "If he plays and uses cards of only 1 suit during his phase 2, he draws a card at the end of his phase 3. If the drawn card is the same suit he was playing and using during phase 2, he draws another."

  4. A powerful defensive/offensive ability: "Anytime Jack is hit by another player, he may "draw!" On royals, his attacker loses a life point." Jack would definitely only have 3 life points if he was given this ability. This defensive ability could be inverted, so that "Anytime Jack hits another player, that player must "draw!" On spades, that player loses another life point."


Any opinions on which 1 you think is best? I prefer one of the first or second options myself, but I am interested to see what you think.

__

To the next item of business! I need to have the Robbers' Roost characters playtested before I have people printing them off using printing services. If I updated 2 8.5" x 11" card sheets with them, would anyone bother printing them out, playing with them, and reporting how the play tests go?

Sunday, August 7, 2011

Tutorial: How to Create and Balance a New Character Ability

BANG! Custom Character from BANG! Director's Cuts
As I have been working on a tutorial series that shows how to graphically design a BANG! character card, I thought I would also provide a tutorial on how to create a balanced character ability. Often when we add a new character to a game, we think, "wouldn't it be cool if there was a character that did XYZ?" While this is often a good starting point and can lead to some very creative ideas, it doesn't often lead to balanced gameplay. Typically, such custom characters will end up being OP (like several Wild West Show characters) or too weak. In this tutorial, I will discuss first some strategies in thinking of new abilities. Then I will discuss some ways to balance that ability. Before starting this tutorial, I recommend downloading my Character Ability Stats spreadsheet, which is available both in Open Office and Excel formats. It will help you follow along and understand many of the points that I cover in this tutorial.

Part 1: Creating a New Character Ability.

Some of you may already have new character abilities in mind. When I started thinking of characters to create I thought of things that irritated me in the game, and how it would be neat if a character could surmount that problem (immunity/resistance to discards and steals, Jail immunity, ability to heal a partner). But if that hasn't worked for you, you might have "modder's block" (like "writer's block") when it comes to thinking of new characters to introduce into the game. Here are 3 quick strategies you can apply to look to create some fun and fascinating new characters. I will provide examples from the characters in the Robbers' Roost expansion to illustrate them. 1. Inverting an Existing Ability. Sometimes creating a new, useful ability can be as simple as inverting an old one. For instance, Robbers' Roost includes a character named Jack West, who is essentially an inversion of Jourdonnais' ability. When another character uses a card or ability to avoid his attack, he may "draw!" On spades, that player must use another card/ability/etc. to avoid his attack, or he takes a hit. If he does so, Jack West may make him "draw!" again. Thus, a defensive "drawing!" ability was inverted to create an offensive "drawing!" ability. BANG! already has some characters who are opposites in this sense. Consider Paul Regret and Rose Doolan, the one possessing a defensive sight modifier (permanent Mustang) with the other possessing an offensive sight modifier (permanent Scope/Appaloosa). Of course, inversions do not work every time. Imagine inverting Slab the Killer's ability to a defensive type: To successfully attack this new character, other player's would have to play 2 BANG! This would be quite burdensome for other characters to accomplish, especially if this new character was the Sheriff. The same would go with an inverse of El Gringo's ability: each time this new character hit another player, he steals a card from him! This seems like a far more powerful ability than El Gringo's (he could steal a lot of cards off of Indians!, Gatling and Howitzer; to an obscene extent in larger games). Nonetheless, it is helpful place to start. Inversions are more easy to apply with clearly defensive and offensive abilities (rather than neutral ones). The character ability stats sheet already helpfully identifies these types of characters in the "Char Type" column. 2. Looking for a Hole in an Ability Type. Several characters in BANG! can be considered as possessing abilities of a similar type. For example,Paul Regret and Rose Doolan are both given the ability type of "Sight Modification." Sid Ketchum, Elena Fuente, José Delgado, Doc Holyday, Uncle Will, Porter Rockwell, and Crazy Wolf are labeled with the ability type "Card Transmutation," since they can play a card(s) as something else/for some other effect. Sometimes these ability types are clearcut (like those above), while others possess surprising variety. Consider the "Card Drawing" abilities of Black Jack and Pixie Pete that are straight forward in comparison to Herb Hunter's, Molly Stark's, Bart Cassidy's, John Pain's and Suzy Lafayette's abilities to draw on specific events (player elimination, playing a card from her hand out of turn, when taking a hit, when others "draw!", no cards in hand). Ability types can have several members in their set that are quite complicated and specific. The character ability stats spreadsheet helpfully groups the BANG! characters' abilities under the "Ability Type" column. Why is this helpful? It should allow you to explore what options are available in an ability type. Some ability types are quite saturated with abilities, such as the card drawing type described above. Others, however, leave considerable room for exploration. You might consider what combinations (in terms of activating events, costs, outcomes, etc.) are unused in a given ability type. Robbers' Roost, for instance, created a niche for Anne Rogers in the copycatting department. BANG! had already provided characters that could copy other characters' abilities. Vera Custer copied the ability of characters in play, while Greygory Deck could copy 2 abilities from randomly selected characters from the base game that were not in play. I thought it would be neat to create a character that copied not the ability of other players, but a card possessed by another player. Having the card copied at random would not be very strategic, so I thought the card copying ability should apply to cards in play in front of other players. Thus, by looking at existing abilities (Vera Custer, Greygory Deck) I could discover other potential abilities (Anne Rogers). As another example of this in Robbers' Roost, Maggie Mae was developed by considering the card swapping ability of Flint Westwood, a character from the Wild West Show expansion. Flint could swap one card from his hand for 2 cards at random from the hand of any player of his choice. Since this card swapping ability was exclusive to the hand, I thought it would be neat to have a card swapping ability that was exclusive to cards in play. Thus, Maggie Mae may swap a card in front of her for a card in play in front of another player. These examples should give you the basic idea of exploring for holes in a given ability type. Finally, you might consider how the effect of a playing card might be sufficiently "universalized" for a character ability. Indians! is basically a Gatling that requires a BANG! to defend. Flint Dixon from Robbers' Roost universalized this ability in sense, by requiring his targets to play BANG! to defend themselves against his BANG!. Thus, playing cards can also be a fruitful ground for conceptualizing character abilities. 3. Something Completely Different: Exploring the Game Mechanics. This next strategy is a bit like the second one. Instead of probing for holes within a specific ability type, we look for unexploited areas of the game mechanics altogether. We consider what parts of the game's mechanics are used in ability types, and what ones are not. Often, an ability will provide an exception to a rule. Lil' Sure Shot from Robbers' Roost is an exception to a game mechanic like Willy the Kid is too. Typically, a player can only have 1 gun in front of them; Lil' Sure Shot does not have to follow that rule. Similarly, a player can only play 1 BANG! on a turn; Willy the Kid (as well as Doc Holyday, and in a way Lee Van Kliff) is an exception. When we discover a game mechanic which possesses no exception (or is not addressed in any way by an existing ability), we can brainstorm about abilities which now utilizes it. A card swapping ability, for instance, was not introduced until Flint Westwood in the Wild West Show expansion. Robbers' Roost also adds some new ability types not utilized before. Some are, in my opinion, very different. Consider the trap placing ability of Eva Place. Once a turn, she may place an expendable (non-blue) card from her hand in front of her, which becomes a trap. Whenever she is acted against, the card immediately activates against that player (and then is discarded). There are some more nuances to her ability, but you get the general idea. I would say that no prior BANG! character really belonged to her type. I could say likewise of Laura Billion who has a card preservation ability. Typically, BANG! rules dictate that once a card is used it is discarded. But what if this wasn't the case? With Laura Billion, the brown, green, and orange cards she uses during her turn are stored in front of her. At the end of her phase 3, she "draws!" On royals, all those cards return to her hand at the beginning of her next turn (instead of ending up in the discard pile). Some types are less radical than these. I consider both Josey Basset and Julie Bullette (from Robbers' Roost) to have "hand building" abilities (somewhat like Kit Carlson). Most hand building characters in BANG! build by having huge card limits (Big Spencer, Sean Mallory). I wanted to have hand builders that did not involve significant card limit manipulation. Take Josey Bassett: If she doesn't play any cards during phase 2, she can draw 2 extra cards. However, she still must discard down to her card limit for phase 3, so the extra cards aren't building the quantity of her hand (as with Big Spencer, Sean Mallory), but the quality of her hand. Julie Bullette may discard 1 card from her hand during her turn to draw another card, again hoping to improve the quality of her hand. Hopefully, these examples will give you some idea of how to manipulate game mechanics to create new ability types. Think of adjusting phase orders for a character, creating abilities that use the values/suits of cards instead of their names, different sacrifices, new events to trigger abilities, and so forth.

Part 2: Balancing a Character Ability.

Now that you have created a character ability, you need to weigh how balanced of an ability it is in comparison to other existing BANG! characters. This will help you adjust your initial ability, as well as weed out particularly poor ones. I have created over 100 custom BANG! characters, but I have scaled back drastically to include only the 16 most solid characters for Robbers' Roost. I imagine that you will similarly hack away at many of your characters. Let me provide some suggestions for balancing character abilities. 1. Ability Type Comparison. A good way to temper your character's ability, so that it is more in balance with the official game characters is to compare the new ability with others of its type. Through doing so, you will often discover whether or not your new character is too weak or too strong. Let me give an example from Robbers' Roost with Lil' Sure Shot. I wanted to create a character that wasn't constrained by the typical 1 gun limit. She could have 2 in play instead. This led to a character whose ability was initally, "She can have 2 guns in play, and fire with both of them within their ranges on her turn." So she could fire 2 BANG! on her turn, within the ranges of her guns. Sounds pretty cool, but there were some problems with this. First, I recognized how difficult it was to have an ability that hinged on possessing 2 guns! The moment 1 was discarded/stolen, she was without an ability. So I changed it so that the moment she played 1 gun card, she could already fire twice: once with the default Colt .45, and again with the played gun card. If another gun card was played, it would replace the default Colt .45. This was better than before, but it was clear that an existing BANG! character was far better than Lil' Sure Shot: Willy the Kid. Willy could play as many BANG! as he wanted with any gun he possessed. Lil' Sure Shot could only play 2 (with variable ranges) by playing gun cards! This seemed far off-balance. The adjustment made her stronger was to specify that once she had 2 gun cards in play, she only needed 1 BANG! to fire both weapons. This distinguished her from Willy the Kid and made her threat value constantly increase as she gained more weapons. This is the current state of Lil' Sure Shot, although she may undergo further changes. But she shows how by considering a character with a similar ability (at least in terms of its practical effect), I was able to rebalance one of my original ideas. 2. Is the Ability Continually Useful?. One common mistake when designing a new character ability is to create an ability that doesn't have much practical value. This often occurs because the ability just cannot be used too often. Consider an ability that allows you to play any Cat Balou as a Panic! While it nice to be able to steal a card instead of discard a card, there are not many Cat Balou in the deck. This means that in the base game your ability only activates on 5% (base) / 4.2% (base + Dodge City) of the cards. Compare that with Willy the Kid or Slab the Killer's abilities, whose ability activates on 31.3%/24.2% of the cards, Elena fuente's that applies to 100% of cards, or Paul Regret's, which is continuous. While you might try to make an ability more powerful the less that it can occur, I think you shouldn't try to create a character whose ability applies less than 20% of the cards (and even then I question doing so). Otherwise, the character's value will be too random from game to game. This is why I think Lucky Duke's character is the worst in the game. 3. The Sheriff Consideration. The next thing to consider with your custom character abilities is how they function as a Sheriff (with 1 extra life point). A 4 life point character might be just fine with his ability, but the moment he has 5 life points, he might become OP. This is generally why there are 3 life point characters in BANG!, and you should consider nerfing their life points likewise. They may be too weak in their 3 life point model, so you might want to tweek their ability slightly, so that it is better. 4. 2-Player and Renegade Considerations. Another thing to think about when creating a character ability is how the character fairs when only he is alone with 1 rival in the game. Typically, I try to create characters that still have value in the 2-player situation. For one, it still makes them useful in 3-player BANG!, and doesn't leave the character at the mercy of his team mates playing well. And it helps out if the character's role is a Renegade, and so destined to reach a 2-player face off if he is to win. True, there are several characters in BANG! already whose abilities are useless (Vulture Sam, Herb Hunter, Greg Digger, Tequila Joe), weakened (Vera Custer, Big Spencer), or wholly negative (Claus the Saint) in 2-player. So this may not bother you. But it is at least worthy of consideration when designing a new character ability. For instance, I have heard of many "medic" style characters who can heal other players. But does this character really have value in a 2-player setting if he is the Renegade? He will not want to heal his opponent. This does not mean you have to out right reject a medic ability. The "medic" style character in Robbers' Roost is Johnny Pope, but to balance him for 2-player scenarios he can give up a life point to transfer a life point to another player OR make a player "draw!" On reds, he steals a card from that player (equivalent of a Rag Time), and on blacks the target must discard 2 cards with missed! or lose a life point. This makes him far more valuable as a Renegade and in 2-player scenarios. 5. Playtesting. While the above "a priori" methods are helpful, it should never replace good playtesting. Martin Blasko over at bang.cz recommends playtesting each character around 50 times in different roles. That may be excessive, but you do not to see how they function with other characters and in a variety of different card-playing scenarios. Playtesting often reveals unforeseen consequences of certain abilities. One of the easiest ways to playtest characters and any cards for that matter is to write the character (name, ability, # life points), on a slip of paper. Cut out this description and have it passed out with the other character cards to test them out. If you want the card to be more "randomly" passed out, simply place all the character cards you are going to use in card sleeves. Then, place the cut-out custom card description inside one of the sleeves over one of the cards. It can now be shuffled and dealt out with the others, without others knowing it is a custom character beforehand. 6. Character Types Dealt. As a final consideration, you might weigh how adding your custom characters to the game affects the ratio between offensive, neutral, and defensive characters. If most of your characters are offensive, you might be skewing the game in favor of the Outlaws. Try to maintain this ratio as closely as possible. Neutral characters tend to be the safest best to add to the game, given that they work so well for all of the different roles. This concludes the tutorial. I hope it will help you create fascinating and balanced BANG! characters that improve BANG! gameplay both amongst your friends/family and with the wider BANG! community. I would love to see your character creations. Feel free to send some to me when you have the chance, or post them here!

Thursday, July 21, 2011

Design: Character Ability Stats

In an effort to help modders (those wishing to make their own custom expansions for BANG!), I have created a spreadsheet that expounds the intricacies of each character ability in the official BANG! card game and its expansions, as well as in Robbers' Roost. Such a spreadsheet should be useful for modders in both thinking of new characters and balancing the abilities that they think of by comparing them with characters in the game already.

The spreadsheet contain the following information on characters:
  • Character Names.

  • Expansion included in.

  • Number of Life Points.

  • Character Type. As with the character guides, I have broken these up into 3 general categories: offensive (i.e. Slab the Killer), neutral (i.e. Black Jack), and defensive (i.e. Elena Fuente).

  • Ability Type. I have provided several hopefully helpful labels of character abilities that should allow you to sort characters together by their ability type. Thus, Rose Doolan and Paul Regret are both given the ability type of "Sight Modification." Sid Ketchum, Elena Fuente, José Delgado, Doc Holyday, Uncle Will, Porter Rockwell, and Crazy Wolf are labeled with the ability type "Card Transmutation," since they can play a card(s) as something else/for some other effect.

  • Mode of Operation. This column has 2 values: optional or necessary. Generally speaking, it identifies whether the ability can be activated by the character's choice (Chuck Wengam) or if it is forced (Claus the Saint, Paul Regret).

  • Activator. This column describes who brings about the ability's activation. Sometimes this is done by oneself alone (Slab the Killer when playing a BANG!), by others (when Jourdonnais has a BANG! played against him), and by both (Suzy Lafayette, when playing her last card, or by having another player discard the last card from your hand), and sometimes this does not apply (Pixie Pete when he draws his 3 cards; he didn't bring it about, it occurred from the normal course of his turn).

  • Activating Time or Event. This column explains when the ability an be used, such as during a specific phase of a turn, when the target of a specific card, when "drawing!", etc. Sometimes, the ability is continuous (Sid Ketchum, Apache Kid).

  • Cost. This column notes if the ability has a cost to activate it, such as discarding/playing a card(s), losing a life point (Johnny Pope), using a card out of turn from one's hand (Molly Stark), not drawing cards from the deck (Pat Brennan), giving up copied abilities (Greygory Deck), and so forth. Often, there is no cost to use the ability, and this is also noted.

  • Outcome. This column observes the outcome of the ability after all else is considered. Thus after playing a brown card and discarding a BANG! during phase 2 of his turn, the outcome of Lee Van Kliff's ability is that the effect of the brown card is replicated. Some of these outcomes are complicated (Crazy Wolf, Claus the Saint), but I try to express them as best I can.

The hope is that this spreadsheet is that you will be able to group together characters with a similar ability type to a character you are considering to create. If his ability tends to be stronger than characters of his ability type, this should suggest to you that the ability needs modification.

I would love to get some feedback on this spreadsheet. It has taken a good chunk of time to put together, but I am sure there are typos, inconsistencies, and some poor labels. Feel free to post comments here.

I have made the spreadsheet available in both Open Office Calc and Microsoft Excel formats.

Saturday, June 18, 2011

Robbers' Roost: POD Character Update

Since losing my computer, it has taken some time to rescan art I have drawn, BANGify the art, and recreate some templates. I finished the characters early this afternoon:

Robbers' Roost POD Characters Updated


As you can see from the image above, I also changed some of the art. I felt some of the old art was a little bland for the characters, or didn't fit their ability/historical figure as well. I hope you will like the changes. In the mean time, I have also rebalanced some of the character abilities and modified others. Of note (changes made in bold):

  • Queen Anne: She may discard a BANG! with another card to discard a card from any player she sees within distance 2.

  • Eva Place (3 life points instead of 4): She may lay a trap once on her turn: put a brown or green card face down in front of Eva and turn it sideways. If a player acts against Eva, she must flip the trap over and the card immediately affects that player. She may have two traps out, but only 1 trap activates at a time, her choice.

  • Lela Devere: Whenever she would personally hit a player, Lela may choose to steal a card from that player instead. The card may either be in that player’s hand or in play.

  • Josey Bassett (completely redone): If Josey plays no cards during her turn, she can draw 2 extra cards at the end of phase 2. She can always hold as many cards in her hand as her max health.

Sunday, April 17, 2011

Robbers' Roost: Third Day of Release

Robber's Roost BANG! Playing Cards


For the third day of the release, I am posting some of the playing cards. This card sheet does not include any of the orange cards, but contains 8 of the other playing cards I plan on adding to the deck. It was hard to make a choice, but so far Cowboy Boots, Bulldog, James Dougall (which I earlier axed, but have now brought back), Distracted, Rattlesnake, Tomahawk, Pay Day, and Cannon. You will notice Cannon has the nifty "line of fire" symbol I created for it. Hopefully my choices are not too depressing.

This card sheet, as is the case with the character card sheets, is specifically designed for the plaincards.com card stock templates. Unfortunately, the cards will have to be trimmed and rounded. I have done this for my prototype deck and it turned out quite well, but it was somewhat time consuming. Sadly, PODs won't do custom-sized decks for small runnings. However, I have contacted a POD who is willing to cut the cards for me for $40/hour. He says he can do about 10-12 72-card decks in an hour. My hope is to be able to create a sort of groupon deal that splits the costs of cutting. That way people only have to be pay around $3.50 more for the cost of the trimming. That is the only way I can think of at the moment to keep the costs cheap and cut out the labor (I could of course, pay for 10-12 decks myself up front, and then give them to people on a case by case basis as they pay for the production costs; but I would prefer not to front $100+ if I can). I'll keep you posted on POD possibilities for Robbers' Roost in the future.

Download the third Robbers' Roost cardsheet (Playing Card Set 1)

Saturday, April 16, 2011

Robbers' Roost: Second Day of Release

Robbers' Roost BANG! Expansion Cardsheet 2


Today is the second day of the Robbers' Roost release. I am releasing the next (and last) set of characters for this expansion. While others again may make it in a bonus pack, these are the core Robbers' Roost characters. As with the set of characters before, many of these abilities have undergone changes, as well as the art and names. I think you will find this set of 16 characters satisfying, or at least that is the hope.

I had a lot of fun with this last set of characters, adding in a lot of new ideas, such as: the use of "traps" with Eva Place, card swapping with Maggie Mae, salvaging used cards with Laura Billion, exploring different gun mechanics with Lil Sure Shot, a "tapped" ability with Turd Ferguson, overcoming distance through discards with Porter Rockwell, and a "Cat Balou" ability with Queen Anne. I am not certain on the life points of certain characters such as Maggie Mae and Eva Place, but playtesting should help figure that out.

Answers to many anticipated questions regarding these character's abilities will be in the upcoming Robbers' Roost guidebook. Anyway, 8 more days! See you tomorrow.

Download the Second Set of Robbers' Roost Characters

Wednesday, March 30, 2011

Tutorial: How to Make BANG! Character Cards (Part 1)

News (8/24/11): The second part of this tutorial is now available! Place your custom character images in card sheets.

Custom BANG! cards

Since dv-Giochi placed blank character and playing cards in their special edition Bullet (and probably before then I concede), BANG! fans have become increasingly interested in making their own cards. My own Death Mesa and Robbers' Roost expansions are evidence of this, as well as El Dorado, O. K. Corral, and numerous images and files on the web. These custom cards come in a variety of formats and styles, and are produced at differing levels of quality.

Today, I wanted to start a tutorial that teaches others how to create a BANG! character card, in terms of conceptualization, design, and production. It will aim to teach you to create the highest quality cards and characters possible (at least, as far possible as I can teach you!). As a consequence, it may seem a bit elitist and daunting. The cards will be designed in both Adobe Photoshop and Illustrator CS3, which do cost a pretty penny. You may not have or be able to afford these programs. Adobe does, however, offer 30-day Trails if that interests you.

The first part in this series will focus on designing an image for a BANG! character card, which will mimic the images on other BANG! cards.

Part 1: Designing a Character Image for a BANG! Character Card


Let's take a look at a BANG! character card, and examine its image. In this tutorial, I will be looking at El Gringo:
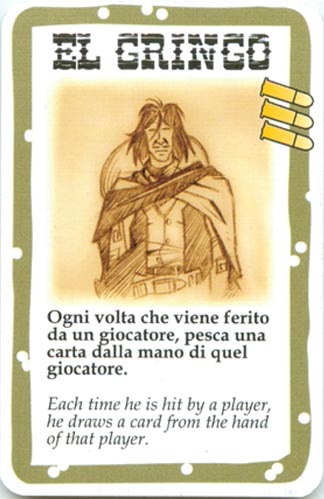
El Gringo BANG! character card

In terms of style, the things I notice about the drawing of El Gringo is:
  1. The image is sketchy, perhaps with a pencil, or etched. It has a cross-hatched effect in the sketch.

  2. There is a tannish background which varies in its darkness and lightness around and on top of the sketch.

  3. The sketch is pronounced on this background, not subdued and melting into it.

  4. The edges of the picture are not sharped and pronounced but blend into the white background of the card.

Those are the sorts of effects that we will need to recreate ourselves. I will present how to recreate these effects in a series of steps.

Step 1: Create a Name for your BANG! Character.

Picking a name for your character will help you in the design process. For one, it will help you select a gender, and perhaps also the style of the image and character's attitude (think of what "Slab the Killer" suggests, for instance). You might even think of the name in terms of its role: Outlaw, Renegade, Deputy, or Sheriff. A lot of the BANG! characters, and all of my Robber's Roost characters, are inspired by historical figures, Western actors, or a word pun on a western theme (like my "Loan Arranger" punning on the "Lone Ranger"). If you are having trouble thinking of names, slightly modify the name of a historical figure. You can find a complete list of Old West Gunfighters, Lawmen, Native Americans, Outlaws, Women, and Vigilantes at the Legends of America website. I used this site numerous times as I planned out my characters.

Step 2: Draw or Find a Sketch of a Western Character.

You will need to either draw your own character, or find one online that mimicks well the style of the official BANG! cards. If you opt to draw your own, study the official cards to get an idea of how they draw their characters. Try to create that cross-hatched effect yourself, which is often done in the shadows or dark clothes. In the El Gringo example, the cross-hatched effect goes in one general direction, but this isn't the case in all BANG! character cards. I tried to create this general cross-hatch effect myself with Jack West:

Jack West Robber's Roost BANG! character card

Once you have drawn one or more characters that fit the name(s) of the characters you picked, scan them on a computer. I would not take a picture of them on a camera! Use a scanner that allows you to scan the drawings to a very high quality. Quality is often determined in terms of DPI (data pixels per inch), and I wouldn't scan the images in anything less than 300. I typically scan my images at 600 DPI; this presents less problems for resizing, and allows you to have the highest quality print of your drawing later. Here is the outcome of such a scan on my ScanSnap:

Custom BANG! Character Drawings

If you do not want to draw your own character, do not despair! There are several websites where you can find sketches: Concept Art, Google Image Search, and Deviant Art. As you browser through images (you can always search for "cowboy," "cowgirl," or "west gunslinger" for instance), try to pick images that fit the sketchy and slightly cartoony feel of the original BANG! cards. While it does not functionally matter too much in making your own card, it does create an aesthetic synthesis that brings at least to me great satisfaction. Thus, the picture on the left here is clearly a drawing of a Western character that could work, but it does not have the BANG! style. The picture on the right, however, is much closer, although it is still lacking in some areas.

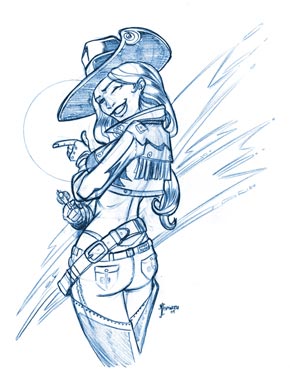
Sample Image 1Sample Image 2


When searching through other people's images you will have to decide how picky you are willing to be with their images. If you are so picky that you tend to like none of them, it's best to draw them yourself or get one of your artist friends to do some for you (free food for them can go a long way, eh?). Another consideration when browsing through art online is whether the image is large enough and of high enough quality. Since most images online are between 72-90 DPI, which looks horrible on print, you should only select images that are very large. That way you can resize these images later to be the appropriate DPI without suffering loss in quality. You can generally customize searches for larger images when using search engines. Artists on Deviant Art and Concept Art often post their pictures in larger sizes, so this is less of a worry with them.


Step 3: Adjusting your Image to be the Right Size.

Now that you have found or scanned in your drawing, we can fiddle with it to have the same proportions as the original BANG! cards. If you scanned in your image, you are going to want to select the art you are interested in and crop the image. Use the rectangular marquee tool and select the interested art in such a way that you enclose it in almost a square.
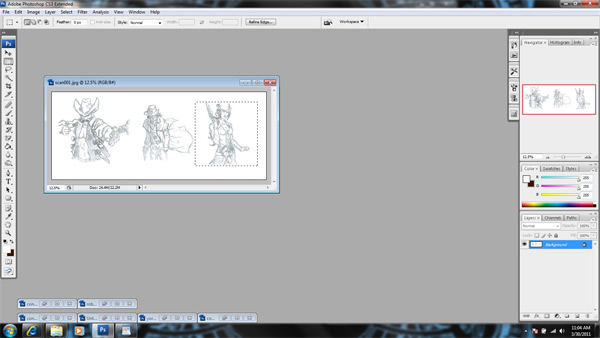
BANG! custom characters tutorial screenshot 1

Then select from the top menu Image > Crop. It crops! You probably did not make a perfect square, so let us adjust the canvas size. Select Image > Canvas Size.

BANG! custom characters tutorial screenshot 2

The Canvas Size window should pop open. You should see 2 input boxes for the image's width and height, as well as drop down menus next to them that provide options for the kind of measurement. Your width or height is bound to be larger than the other. It is now up to you whether to make the image larger or smaller by making the smaller size equal to the larger size, or the larger size equal to the smaller size. This decision will probably be made based on whether or not the drawing is running off the canvas, and on which side the image is running over. If the image is not running off the canvas on any size, shrinking the canvas is probably a good idea. If it is running over, you probably don't want to shrink the canvas, unless you are trying to zoom in on a specific part of the art.
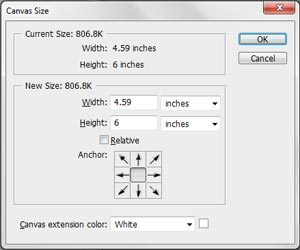
Canvas Size Window

When adjusting the canvas size, you wil notice a square with 9 tiles. The inner tile is empty, while the other tiles have arrows pointing out in different directions. These arrows will specify where the canvas will be cut or expanded. For example, if I wanted to shrink the height of an image to equal the width, I could cut off the height at the bottom or the top of the image, or be cut off equivalently between the top and the bottom. The arrows control where the cropping (or expansion) takes place. If I wanted to crop the top of the image, I should select the down arrow. You will notice that the arrows and the inner tile will scoot down when you press the bottom arrow. The top 3 tiles will now be empty. These top tiles signify the area of the image that will be cut off at the top. Conversely, if you had selected up the up arrow, the arrows and inner tile would have scooted up, and the bottom 3 tiles would be empty. This would have signified the area from the bottom to have been cut off. As you can easily deduce, the left right arrows are used for when the width is to be adjusted, and the diagonal arrows are used for when both the width and height of the canvas are to be adjusted. Once you make your decision, press the "OK" button. The canvas will shrink or expand to the parameters you selected.

As you adjust a canvas size, some design decisions do come in. You may choose to crop the image smaller to focus in on a part of the image (if it is of high enough quality), and then shape it into a square with the Canvas Size tool. Or you may choose to simply extend the canvas of the full image to a square. Let's use the Cowgirl picture I showed above as an example. As nice a butt as this cowgirl has, I may want the character image to just show her upper half instead.
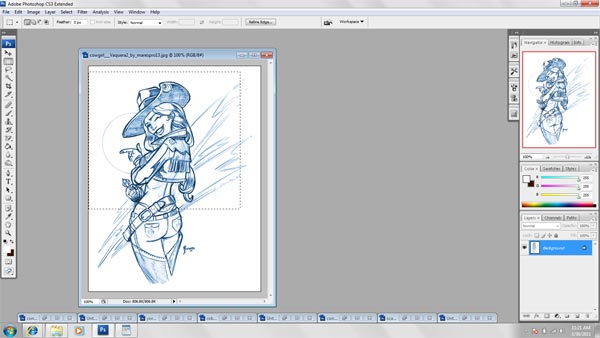
BANG! custom characters tutorial screenshot 3

So I select a squarish select from her upper half and crop it (Image > Crop). I edit the canvas size to crop the sides from my cropped selection that was too wide (Image > Canvas Size). The outcome is this:
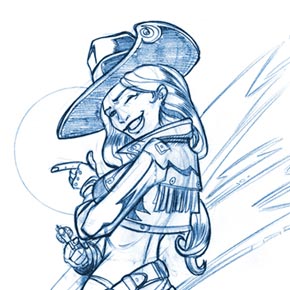
Cowgirl Possibility 1

Conversely, I could simply take the original cowgirl image and edit the canvas size so that the width equals the height. If I do so, I have this outcome:

Cowgirl Possibility 2

Both of them could make nice character images. Personally, I prefer the first one as it will be larger on the printed card. You will notice that very few BANG! cards show the whole body of each character, but you might prefer seeing the characters in their "full glory."

Anyway, once you have decided how you want the character art to be displayed and made the corresponding canvas size adjustments, you will need to resize the image. From my measurements, the BANG! character card images are approximately 1.563 inches (Photoshop won't let you go further than 3 decimal places, and for the naked human eye any difference beyond this is trivial anyway). We will want to resize our images to those measurements. So, resize the image by using the shortcut ALT+CTRL+I or selecting Image > Image Size.

BANG! custom characters tutorial screenshot 4

The Image Size window should open. In the window, there should be input boxes for the width and height of the Document Size. Change these both to 1.563 inches (the measurement type to the right should be at inches by default). Below the Doument Size area should be an input box for the image's Resolution. Set this to 300 DPI (the measurement type should again be at pixels/inch by default, which is correct). Now, check your Pixel Dimensions, which is at the top of the window. It should list two file sizes right after the colon. The first size is the file size after the adjustments you have entered. The second is the file size before the adjustments you have entered. As long as the file size after the adjustments is roughly equal to or less than the file size before the adjustments (it can be a bit larger, but not much), you should end up with a image that will print very nicely as a BANG! card. If the file size is much greater, you will have to either adjust canvas sizes to have a smaller character on the card, or scrap this image altogether and select another one that will work better. It's a tough world. Once you have made this quality check, press the "OK" button. The image should be resized approriately!

Step 4: Adjusting the sketch's color and brightness/contrast.

Many sketches that you find online or even sketch yourself will be the wrong color and brightness for BANG! cards. In the cowgirl example the sketch is in blue, which is not desirable. Fortunately, we can easily fix this problem in Photoshop. Just select Image > Mode > Greyscale. When a window pops up asking about discarding color information, select Discard. Your image's colors should now adjust to something like this:
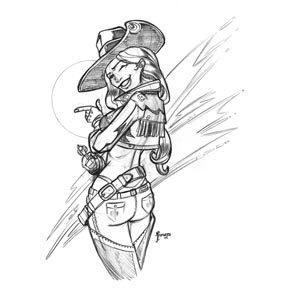
Cowgirl Greyscale

We are doing this simply to standardize the colors of the sketches. Now, we will adjust the mode to CMYK, by selecting Image > Mode > CMYK Color. That way we can have more than black and white colors for this image.

The image that we drew or found online may be too bright (and possibly too dark) for a BANG! card. As we noticed with the El Gringo card, the character sketch was pretty pronounced. We can make our image more pronounced by selecting Image > Adjustments > Brightness/Contrast. A window should pop up that allows you to scale the Brightness and Contrast of the image. Since we want to darken the image, we want to lower the Brightness. In my example, I lower it to -40.
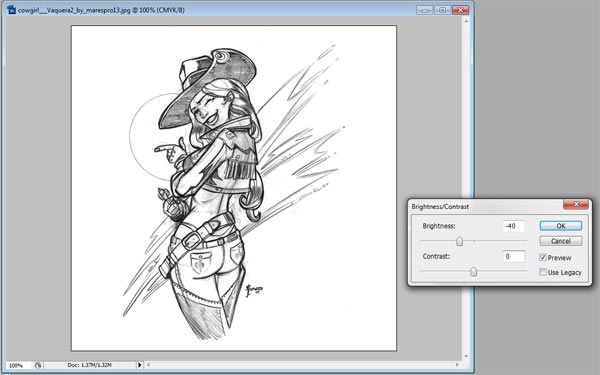
BANG! custom characters tutorial screenshot 5

However, as you lower the Brightness of the image you will notice that lighter, even messy areas of the image become more pronounced. Sketches often have a softer layer that they are built upon and you don't want this soft layer to be pronounced. To fix this, increase the Contrast of the image. In my example, I am increasing it by 80.
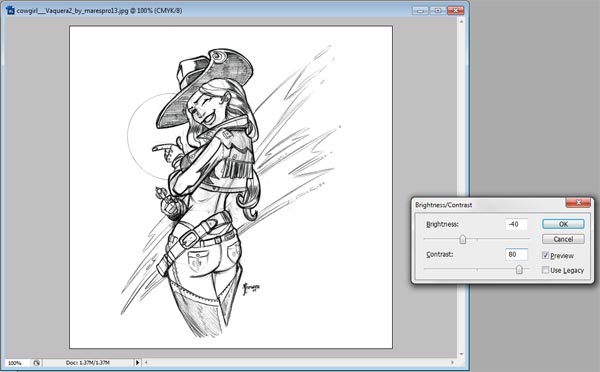
BANG! custom characters tutorial screenshot 6

Now the main strokes of the image are darker and the softer layer is not pronounced. Good. Press the "OK" button. You now have a darker version of the original image.

NOTE: If doing this step has made the background around your sketch darker, then the sketch you picked was pretty dirty. I would recommend using the lasso tool and selecting the parts of the messy background that need clean up and then deleting them.

Step 5: Adding a Background Color.

The BANG! character images don't have a white background, so we need to find a way to place our sketch on a more tannish background. This is easy to do in Photoshop. First, make sure the Layers window is open (this is typically in the bottom left of the screen. If it is not open, select Window > Layers, or simply press F7. You should notice a window that has the current layer, labeled "Background" highlighted in blue. It should also have a padlock to the right of the "Background" text.
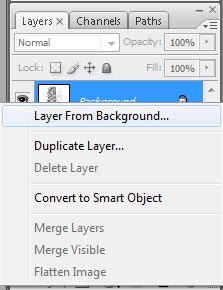
Layers menu 1

Right-click on this layer, and select "layer from background." A New Layer window should upon up; select "OK." The layer should now be renamed, "Layer 0." Next, click on the "create a new layer" icon, which is the page icon that has the left corner turning up. It is at the bottom of the window towards the right.
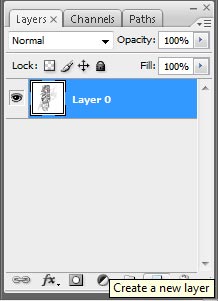
Layers Menu 2

A layer should then be created that is above "Layer 0." It should now be highlighted blue and labeled "Layer 1." This new layer is the layer on which we are going to create our background. We need to get a good background color from an Original BANG! card. Pulling from the El Gringo image, we should select a color from the background that is not too bright or too dark, but represents a good middle for the colors of the tan background. I am going to use color #ffe1a1 for the background color, but you can always save the El Gringo image, and use the eyedropper tool to select the background color that you like. After you have selected a color, pick the Paint Bucket tool. Click on the image canvas and fill Layer 1 with this color.

BANG! custom characters tutorial screenshot 7

Since Layer 1 is on top, the color should cover up the sketch. To make it show through we need to select from the drop down menu in the Layer window. The drop down menu we want has "Normal" as its default value. This controls the layer's transparency. We want to click on the drop down menu's arrow and select "Multiply." The sketch of the bottom layer should now show through as in the example above.


Step 6: Adjusting the Sketch Colors.

So far, so good. It should be immediately apparent that the sketch is too dark for the original BANG! cards, so now we are going to edit the sketch's color balance. First, select "Layer 0" in the Layers window, as we want to be editing the layer with the sketch on it, not the layer with the background color. Then open up the "El Gringo" image and place it next to the image you are trying to make. This original BANG! card image will function as a color control for your image.

Select the image you are creating and then pick Image > Adjustments > Color Balance from the top menu (or use shortcut CTRL+B). Now the Color Balance menu should open and you should see three different sliding scales for Cyan/Red, Magenta/Green, and Yellow/Blue. You are going to want to adjust these scales until the color of the sketch is close to the color of the El Gringo sketch. You will want to slide the Yellow/Blue scale all the way to the left, and move the Cyan/Blue about a third of the way to the right, and the Magenta/Green about a third of the way to the lift. Then near the bottom of the Color Balance window you should see an area called Tone Balance with 3 radio buttons: Shadows, Midtones, and Highlights. Midtones should have been the one currently selected. Select Shadows, and then alter the 3 scales again until it best matches the El Gringo sketch's colors. Each image will differ some in how much it needs to be adjusted. But you should be able to match the colors pretty closely.

BANG! custom characters tutorial screenshot 8

If you find that your sketch is too dark, fiddle with the Brightness/Contrast controls, and then the Color Balance tools again, until you get the right mix. Your sketch is now complete!

Step 7: Editing the Background to have a BANG!-like Feel.

In comparing our current image with the El Gringo image, we will quickly realize that our background is static; just 1 color. The El Gringo background has a lot of variety to it. We can create some variety to our background by using the Burn and Dodge tools. These tools are located 2 spaces below the paint bucket tool.

Dodge and Burn Tools

In this image, I have the Dodge tool selected. Click and hold down on this tool and slide your mouse slightly to the right. A menu should appear to the right with 3 options. Select the middle one that has the hand icon, which is the Burn tool. Just below the top menu, you should notice some tool options for the Burn tool. The second item over in the tool options should be labeled, "Brush." Click on the arrow to the right of it. A window should appear that allows you to select the diameter of the burn tool.

Burn Tool Brush Menu

Type in 100 px into the Master Diameter input box, and then press the arrow to the right of the "Brush" label again to close the window. Next, look for the "Exposure" label in the Tool Options menu. Input 30% into the input box. Now we are ready to use the Burn tool. Click on the image that you are trying to edit and then select "Layer 1" from the Layers menu. This is the layer that has the background color on it that we wish to edit. Move your cursor over the image; you should see an outlined circle that demarkates the area the Burn tool will affect on the image. By holding down the cursor over the image, and moving the cursor around the image in the areas you wish to darken, the image will correspondingly darken. Fool around with this a bit. If you don't like the move you just did, you can always press ALT+CTRL+Z to move one step back. Once you get the hang of it, darken parts of the background to your liking. For certain parts of your image where you want a smaller burning circle, press [ to decrease the size of the circle (conversely, you can press ] to increase it).

BANG! custom characters tutorial screenshot 9

After you are done darkening the background, you may also want to brighten parts of the background. For this, you will need the Dodge Tool. Click and hold on the toolbar where the Burn tool is selected and move the cursor slightly to the right. A menu should appear to the right with 3 options. Select the 1st option with the black magnifying glass, which is the Dodge tool. The Dodge tool can be customized just like the Burn tool and I would recommend customizing it just as the Burn tool was above. You use the Dodge Tool just as the Burn tool is used. Use it to brighten desired areas of the image to create a background similar to that in the El Gringo image.

BANG! custom characters tutorial screenshot 10

Once you have done so, you should have a background that looks something like this example. We are almost done!

Step 7: Editing the Image Border.

As we studied the El Gringo image, we noted that the edges of the image slowly fade into the white. We can create a similar effect ourselves. Begin by creating a new layer (remember, click the icon that has a page with its left corner turning up at the bottom of the layers menu). "Layer 2" should now be created. Click and drag this layer below "Layer 0" and then let go. Next, select the Paint Bucket tool. You will want to choose the color white. Click on the left pallette near the bottom of the toolbar. In the color gradient that upons up, click and drag the circle in the color gradient to the top left corner (RGB should all be at 255). Then click "OK." Then click on the image with your Paint Bucket. No visible effect should have happened yet. We are doing to have a clean white base at the bottom of our image. While in my cowgirl example the background is already white, this is not the case for all images, and definitely is not the case with full color images used for custom BANG! playing cards. I think this is a good habit to establish when making BANG! card images.

Now select the Rectangular Marquee Tool (the second tool on the toolbar). A tool options menu should open again just below the top menu.

Rectangular Marquee Tool Menu

Look for the label named "Feather" and type in 4 px into the input box. Then, select Layer 1. Next, using the rectangular marquee tool position the crosshairs of the cursor in the top left corner of the image with the top hair of crosshairs touching the top edge of the image and the left hair of the crosshairs touching the left edge of the image. Hold down the cursor at this point and drag it all the way over to the bottom right corner of the image, having the bottom hair of the cursor touch the bottom edge of the image and the right hair of the cursor touch the right edge of the image. Then, release to make this selection.

BANG! custom characters tutorial screenshot 11

You should have a selection something like this, with the selection having rounded corners. Now pick from the top menu Select > Inverse (or press SHIFT+CTRL+I) to invert the selection. Press the delete key. Then, select Layer 0 and press the delete key again. The edges of the image should now fade a bit into the white base of Layer 2. Your image is now complete! Select File > Save As from the top menu (or press SHIFT+CTRL+S) to save the image. I would save it in the Photoshop format (.psd). This format will preserve the layers of the image, which will help you if you wish to edit the image in the future.

Completed Cowgirl Custom BANG! Character Image

Congratulations, you have taken some important steps towards making your own custom BANG! Character cards. In the next part of this tutorial, I will how to incorporate custom images like these into the BANG! Master Template for InDesign.

Friday, March 4, 2011

Robbers' Roost Characters: Chuck Parkhurst, Fannie Porter, & Big Nose Kat

NOTE: Now that RR has gone through significant revisions, all these characters have been eliminated. This post is kept here for historical purposes (tracking RR's development) alone. For the characters actually in the RR expansion, go the official page.


Today I thought it might be nice to take a break from the strategy guides and add some more Robbers' Roost characters. I am adding so many I will probably have to widdle them down, or I suppose I could just leave that up those who want to play with the characters. Anyway, I have three female characters to showcase now. I particularly like Chuck Parkhurst. You will have to let me know what you think. Oh, and the art used for these characters is borrowed; not my own.


Chuck Parkhurst Robber's Roost Character
Chuck Parkhurst. 4 Life Points. Once per round, she has a free BANG! that does not add to her card limit. Turn your character card sideways to indicate when you have this BANG! When it is used, turn the card back to its normal vertical position. These BANG! do not stockpile.

Fannie Porter Robber's Roost Character
Fannie Porter. 4 Life Points. Anytime she is attacked by a card where she is the sole target, "draw!" On clubs, discard a card from the player who attacked her.

Big Nose Kat Robber's Roost Character
Big Nose Kat. 4 Life Points. Anytime she hits a player who was her sole target that player must discard a card from his hand.

Visit the Robber's Roost Expansion Page

Tuesday, February 22, 2011

Robbers' Roost: More New Characters for the week

NOTE: Now that RR has gone through significant revisions, all these characters except Maggie Mae have been eliminated. This post is kept here for historical purposes (tracking RR's development) alone. For the characters actually in the RR expansion, go the official page.


As I mentioned that I probably would, I have some new characters to introduce this week. One is pretty different (Gunplay Maxwell), and I hope you will enjoy it: his ability is unlocked based on his gun range in comparison to another person's gun range. Besides him, the other 2 characters' art is not my own. I just found these sketches online (and I thought they fit the BANG! style enough), so don't give me credit for them! I hope you will notice that I have added a lot of female characters to BANG! They were a little lacking in the original game and its expansions. And the discerning reader to my Robbers' Roost characters may have noticed that all of my characters are actually based upon real historical outlaws, lawmen, horse stealers, etc., or on some pun (such as "Loan Arranger" for the Lone Ranger), or on some Western actor (Charleston Heston for Charlton Heston). I'll give their inspirations when I finally get to doing Robbers' Roost character guides, but Dodge City, Wild West Show, and the Bullet characters have precedence there (not to mention the original game characters that I am still plowing away on). Anyway, I hope you'll like these new characters.


Gunplay Maxwell Robber's Roost Character
Gunplay Maxwell. 4 Life Points. Whenever he plays a BANG! against a player who has a gun with a greater range than his, that player cannot play or use any spades or hearts to avoid his attack (this nullifies successful Barrel "draws!").

Bella Siddons Robber's Roost Character
Bella Siddons. 3 Life Points. Whenever she has less than 2 cards in play in front of her, she may discard a card from her hand to draw the blue or green card from the discard deck that is closest to the bottom. This card can immediately be brought into play.

Maggie Mae Robber's Roost Character
Maggie Mae. 3 Life Points. If the second card she draws is red, she may swap a card in play in front of her for a card in play in front of another player. She must show that the second card that she drew was red immediately if she wishes to use this ability (she does not need to show the card, only its suit).