As I have been working on a tutorial series that shows
how to graphically design a BANG! character card, I thought I would also provide a tutorial on how to create a balanced character ability. Often when we add a new character to a game, we think, "wouldn't it be cool if there was a character that did XYZ?" While this is often a good starting point and can lead to some very creative ideas, it doesn't often lead to balanced gameplay. Typically, such custom characters will end up being OP (like several
Wild West Show characters) or too weak. In this tutorial, I will discuss first some strategies in thinking of new abilities. Then I will discuss some ways to balance that ability. Before starting this tutorial, I recommend downloading my
Character Ability Stats spreadsheet, which is available both in
Open Office and
Excel formats. It will help you follow along and understand many of the points that I cover in this tutorial.
Part 1: Creating a New Character Ability.
Some of you may already have new character abilities in mind. When I started thinking of characters to create I thought of things that irritated me in the game, and how it would be neat if a character could surmount that problem (immunity/resistance to discards and steals, Jail immunity, ability to heal a partner). But if that hasn't worked for you, you might have "modder's block" (like "writer's block") when it comes to thinking of new characters to introduce into the game. Here are 3 quick strategies you can apply to look to create some fun and fascinating new characters. I will provide examples from the characters in the
Robbers' Roost expansion to illustrate them.
1. Inverting an Existing Ability. Sometimes creating a new, useful ability can be as simple as inverting an old one. For instance, Robbers' Roost includes a character named Jack West, who is essentially an inversion of
Jourdonnais' ability. When another character uses a card or ability to avoid his attack, he may "draw!" On spades, that player must use another card/ability/etc. to avoid his attack, or he takes a hit. If he does so, Jack West may make him "draw!" again. Thus, a defensive "drawing!" ability was inverted to create an offensive "drawing!" ability. BANG! already has some characters who are opposites in this sense. Consider
Paul Regret and
Rose Doolan, the one possessing a defensive sight modifier (permanent
Mustang) with the other possessing an offensive sight modifier (permanent
Scope/Appaloosa).
Of course, inversions do not work every time. Imagine inverting
Slab the Killer's ability to a defensive type: To successfully attack this new character, other player's would have to play 2 BANG! This would be quite burdensome for other characters to accomplish, especially if this new character was the Sheriff. The same would go with an inverse of
El Gringo's ability: each time this new character hit another player, he steals a card from him! This seems like a far more powerful ability than
El Gringo's (he could steal a lot of cards off of Indians!, Gatling and Howitzer; to an obscene extent in larger games). Nonetheless, it is helpful place to start. Inversions are more easy to apply with clearly defensive and offensive abilities (rather than neutral ones). The character ability stats sheet already helpfully identifies these types of characters in the "Char Type" column.
2. Looking for a Hole in an Ability Type. Several characters in BANG! can be considered as possessing abilities of a similar type. For example,
Paul Regret and
Rose Doolan are both given the ability type of "Sight Modification."
Sid Ketchum,
Elena Fuente,
José Delgado,
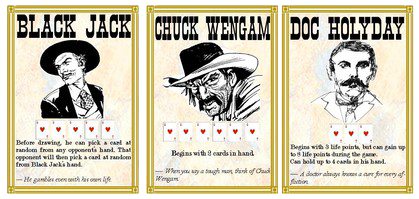
Doc Holyday,
Uncle Will, Porter Rockwell, and Crazy Wolf are labeled with the ability type "Card Transmutation," since they can play a card(s) as something else/for some other effect. Sometimes these ability types are clearcut (like those above), while others possess surprising variety. Consider the "Card Drawing" abilities of
Black Jack and
Pixie Pete that are straight forward in comparison to
Herb Hunter's,
Molly Stark's,
Bart Cassidy's, John Pain's and
Suzy Lafayette's abilities to draw on specific events (player elimination, playing a card from her hand out of turn, when taking a hit, when others "draw!", no cards in hand). Ability types can have several members in their set that are quite complicated and specific. The character ability stats spreadsheet helpfully groups the BANG! characters' abilities under the "Ability Type" column.
Why is this helpful? It should allow you to explore what options are available in an ability type. Some ability types are quite saturated with abilities, such as the card drawing type described above. Others, however, leave considerable room for exploration. You might consider what combinations (in terms of activating events, costs, outcomes, etc.) are unused in a given ability type.
Robbers' Roost, for instance, created a niche for Anne Rogers in the copycatting department. BANG! had already provided characters that could copy other characters' abilities.
Vera Custer copied the ability of characters in play, while Greygory Deck could copy 2 abilities from randomly selected characters from the base game that were not in play. I thought it would be neat to create a character that copied not the ability of other players, but a card possessed by another player. Having the card copied at random would not be very strategic, so I thought the card copying ability should apply to cards in play in front of other players. Thus, by looking at existing abilities (
Vera Custer, Greygory Deck) I could discover other potential abilities (Anne Rogers). As another example of this in
Robbers' Roost, Maggie Mae was developed by considering the card swapping ability of Flint Westwood, a character from the Wild West Show expansion. Flint could swap one card from his hand for 2 cards at random from the hand of any player of his choice. Since this card swapping ability was exclusive to the hand, I thought it would be neat to have a card swapping ability that was exclusive to cards in play. Thus, Maggie Mae may swap a card in front of her for a card in play in front of another player. These examples should give you the basic idea of exploring for holes in a given ability type.
Finally, you might consider how the effect of a playing card might be sufficiently "universalized" for a character ability. Indians! is basically a Gatling that requires a BANG! to defend. Flint Dixon from
Robbers' Roost universalized this ability in sense, by requiring his targets to play BANG! to defend themselves against his BANG!. Thus, playing cards can also be a fruitful ground for conceptualizing character abilities.
3. Something Completely Different: Exploring the Game Mechanics. This next strategy is a bit like the second one. Instead of probing for holes within a specific ability type, we look for unexploited areas of the game mechanics altogether. We consider what parts of the game's mechanics are used in ability types, and what ones are not. Often, an ability will provide an exception to a rule. Lil' Sure Shot from
Robbers' Roost is an exception to a game mechanic like
Willy the Kid is too. Typically, a player can only have 1 gun in front of them; Lil' Sure Shot does not have to follow that rule. Similarly, a player can only play 1 BANG! on a turn;
Willy the Kid (as well as
Doc Holyday, and in a way Lee Van Kliff) is an exception.
When we discover a game mechanic which possesses no exception (or is not addressed in any way by an existing ability), we can brainstorm about abilities which now utilizes it. A card swapping ability, for instance, was not introduced until Flint Westwood in the Wild West Show expansion.
Robbers' Roost also adds some new ability types not utilized before. Some are, in my opinion, very different. Consider the trap placing ability of Eva Place. Once a turn, she may place an expendable (non-blue) card from her hand in front of her, which becomes a trap. Whenever she is acted against, the card immediately activates against that player (and then is discarded). There are some more nuances to her ability, but you get the general idea. I would say that no prior BANG! character really belonged to her type. I could say likewise of Laura Billion who has a card preservation ability. Typically, BANG! rules dictate that once a card is used it is discarded. But what if this wasn't the case? With Laura Billion, the brown, green, and orange cards she uses during her turn are stored in front of her. At the end of her phase 3, she "draws!" On royals, all those cards return to her hand at the beginning of her next turn (instead of ending up in the discard pile).
Some types are less radical than these. I consider both Josey Basset and Julie Bullette (from
Robbers' Roost) to have "hand building" abilities (somewhat like
Kit Carlson). Most hand building characters in BANG! build by having huge card limits (Big Spencer, Sean Mallory). I wanted to have hand builders that did not involve significant card limit manipulation. Take Josey Bassett: If she doesn't play any cards during phase 2, she can draw 2 extra cards. However, she still must discard down to her card limit for phase 3, so the extra cards aren't building the quantity of her hand (as with
Big Spencer,
Sean Mallory), but the quality of her hand. Julie Bullette may discard 1 card from her hand during her turn to draw another card, again hoping to improve the quality of her hand.
Hopefully, these examples will give you some idea of how to manipulate game mechanics to create new ability types. Think of adjusting phase orders for a character, creating abilities that use the values/suits of cards instead of their names, different sacrifices, new events to trigger abilities, and so forth.
Part 2: Balancing a Character Ability.
Now that you have created a character ability, you need to weigh how balanced of an ability it is in comparison to other existing BANG! characters. This will help you adjust your initial ability, as well as weed out particularly poor ones. I have created over 100 custom BANG! characters, but I have scaled back drastically to include only the 16 most solid characters for
Robbers' Roost. I imagine that you will similarly hack away at many of your characters. Let me provide some suggestions for balancing character abilities.
1. Ability Type Comparison. A good way to temper your character's ability, so that it is more in balance with the official game characters is to compare the new ability with others of its type. Through doing so, you will often discover whether or not your new character is too weak or too strong. Let me give an example from
Robbers' Roost with Lil' Sure Shot. I wanted to create a character that wasn't constrained by the typical 1 gun limit. She could have 2 in play instead. This led to a character whose ability was initally, "She can have 2 guns in play, and fire with both of them within their ranges on her turn." So she could fire 2 BANG! on her turn, within the ranges of her guns. Sounds pretty cool, but there were some problems with this. First, I recognized how difficult it was to have an ability that hinged on possessing 2 guns! The moment 1 was discarded/stolen, she was without an ability. So I changed it so that the moment she played 1 gun card, she could already fire twice: once with the default Colt .45, and again with the played gun card. If another gun card was played, it would replace the default Colt .45. This was better than before, but it was clear that an existing BANG! character was far better than Lil' Sure Shot:
Willy the Kid. Willy could play as many BANG! as he wanted with any gun he possessed. Lil' Sure Shot could only play 2 (with variable ranges) by playing gun cards! This seemed far off-balance. The adjustment made her stronger was to specify that once she had 2 gun cards in play, she only needed 1 BANG! to fire both weapons. This distinguished her from
Willy the Kid and made her threat value constantly increase as she gained more weapons. This is the current state of Lil' Sure Shot, although she may undergo further changes. But she shows how by considering a character with a similar ability (at least in terms of its practical effect), I was able to rebalance one of my original ideas.
2. Is the Ability Continually Useful?. One common mistake when designing a new character ability is to create an ability that doesn't have much practical value. This often occurs because the ability just cannot be used too often. Consider an ability that allows you to play any Cat Balou as a Panic! While it nice to be able to steal a card instead of discard a card, there are not many Cat Balou in the deck. This means that in the base game your ability only activates on 5% (base) / 4.2% (base + Dodge City) of the cards. Compare that with
Willy the Kid or
Slab the Killer's abilities, whose ability activates on 31.3%/24.2% of the cards,
Elena fuente's that applies to 100% of cards, or
Paul Regret's, which is continuous. While you might try to make an ability more powerful the less that it can occur, I think you shouldn't try to create a character whose ability applies less than 20% of the cards (and even then I question doing so). Otherwise, the character's value will be too random from game to game. This is why I think
Lucky Duke's character is the worst in the game.
3. The Sheriff Consideration. The next thing to consider with your custom character abilities is how they function as a Sheriff (with 1 extra life point). A 4 life point character might be just fine with his ability, but the moment he has 5 life points, he might become OP. This is generally why there are 3 life point characters in BANG!, and you should consider nerfing their life points likewise. They may be too weak in their 3 life point model, so you might want to tweek their ability slightly, so that it is better.
4. 2-Player and Renegade Considerations. Another thing to think about when creating a character ability is how the character fairs when only he is alone with 1 rival in the game. Typically, I try to create characters that still have value in the 2-player situation. For one, it still makes them useful in 3-player BANG!, and doesn't leave the character at the mercy of his team mates playing well. And it helps out if the character's role is a Renegade, and so destined to reach a 2-player face off if he is to win. True, there are several characters in BANG! already whose abilities are useless (
Vulture Sam,
Herb Hunter,
Greg Digger,
Tequila Joe), weakened (
Vera Custer,
Big Spencer), or wholly negative (
Claus the Saint) in 2-player. So this may not bother you. But it is at least worthy of consideration when designing a new character ability. For instance, I have heard of many "medic" style characters who can heal other players. But does this character really have value in a 2-player setting if he is the Renegade? He will not want to heal his opponent. This does not mean you have to out right reject a medic ability. The "medic" style character in
Robbers' Roost is Johnny Pope, but to balance him for 2-player scenarios he can give up a life point to transfer a life point to another player OR make a player "draw!" On reds, he steals a card from that player (equivalent of a Rag Time), and on blacks the target must discard 2 cards with missed! or lose a life point. This makes him far more valuable as a Renegade and in 2-player scenarios.
5. Playtesting. While the above "a priori" methods are helpful, it should never replace good playtesting. Martin Blasko over at bang.cz recommends playtesting each character around 50 times in different roles. That may be excessive, but you do not to see how they function with other characters and in a variety of different card-playing scenarios. Playtesting often reveals unforeseen consequences of certain abilities.
One of the easiest ways to playtest characters and any cards for that matter is to write the character (name, ability, # life points), on a slip of paper. Cut out this description and have it passed out with the other character cards to test them out. If you want the card to be more "randomly" passed out, simply place all the character cards you are going to use in card sleeves. Then, place the cut-out custom card description inside one of the sleeves over one of the cards. It can now be shuffled and dealt out with the others, without others knowing it is a custom character beforehand.
6. Character Types Dealt. As a final consideration, you might weigh how adding your custom characters to the game affects the ratio between offensive, neutral, and defensive characters. If most of your characters are offensive, you might be skewing the game in favor of the Outlaws. Try to maintain this ratio as closely as possible. Neutral characters tend to be the safest best to add to the game, given that they work so well for all of the different roles.
This concludes the tutorial. I hope it will help you create fascinating and balanced BANG! characters that improve BANG! gameplay both amongst your friends/family and with the wider BANG! community. I would love to see your character creations. Feel free to send some to me when you have the chance, or post them here!