


STEP 1: Find a simple, unique western-themed symbol.
This first step is quite easy. Your task is to find a symbol that is not already used in BANG! (and hopefully other unofficial expansions). This includes:
- Buffalo (Dodge City)
- Man on Horse (Wild West Show)
- Pistol (Bullet characters)
- Ox Skull (Robbers’ Roost)
- Horseshoe (Robbers’ Roost)
- Vulture (Valley of Shadows)
- Film Camera (Directors’ Cuts)
- Cactus (already in BANG! Master Template)
- Wagon Wheel (already in BANG! Master Template)
- Bow and Arrow (already in BANG! Master Template)
What are some ideas for other symbols? Here are some suggestions: the cowboy neckerchief, a teepee, dynamite, a scalping knife, a lariat, a windmill, a tombstone, a bag of money, a paw print, and a train. For my example, I will use a paw print.
To find an image, I recommend using an image search engine (Google Image Search works just fine). Type in the name of the icon you are looking for, and then add something like “symbol” on the end.

Thus, I inputted “paw print symbol” into the textbox. Click on “Search Images.”

You are going to get tons of results. To narrow your results, and get more what you want, select “Black and White” from the list of color options in the left hand column. All expansion symbols are black and white, so this should simplify both finding an image and readying it to place on your BANG! cards.
Scroll through the results until you find something that strikes your fancy.
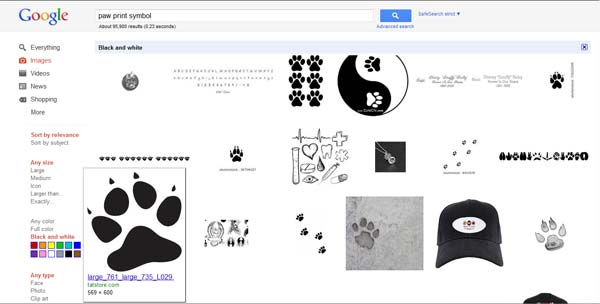
I settled on this image. Generally, you will want an image that has some size, at least 150 pixels+, but it doesn’t have to be too big, as the symbol is small on the card. Once you have made your selection, click on the image. A small preview image should pop up. You can either copy the preview image if it is high enough quality or click on “Full-size Image” in the right hand column. Copy the image.

STEP 2: Prepping the Image.

Open up Photoshop. Create a New Image, and it should already have the correct dimensions for the copied image set up. Paste the image.Then we are going to need to flatten the pasted image. You can do this by either right clicking on a layer in the layers window and selecting “Flatten Image,” or using the main menu, select Layer -> Flatten Image.

Now, we need to erase the white background. The BANG! expansion symbols have a white border around them, but it is not a big white square block! Select the Magic Eraser tool. Once you have it selected, let us get some of the perimeters set up. First, we want to make sure we erase anything close to white, so let us set the tolerance to “30.” Second, let’s check off both Anti-Alias and Contiguous. Now we only have to select 1 white patch to grab everything else. Feel free to click on a white area. You should now have a transparent area wherever white was before. If not, use the magic eraser on any remaining white areas.
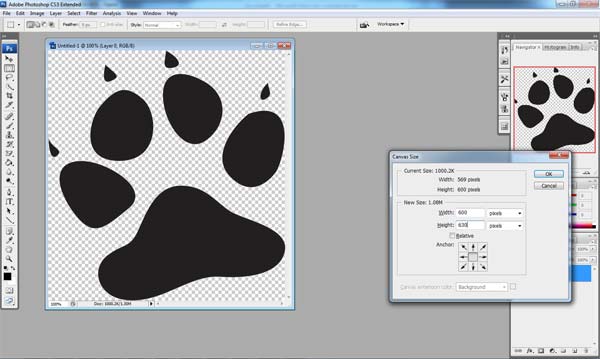
Next, we want to make sure that there is room for a white border to go around the symbol. Often, as is the case in my paw print example, some of the black part of the symbol goes to the edge of the canvas. No good—we will need to adjust the Canvas Size. You can adjust the canvas size by selecting Image -> Canvas Size from the menu, or by using shortcut CTRL-ALT-C. Make sure that there is at least a 10 pixel buffer between the edge of your symbol and the edge of the canvas. I gave a 15 pixel buffer in my example.
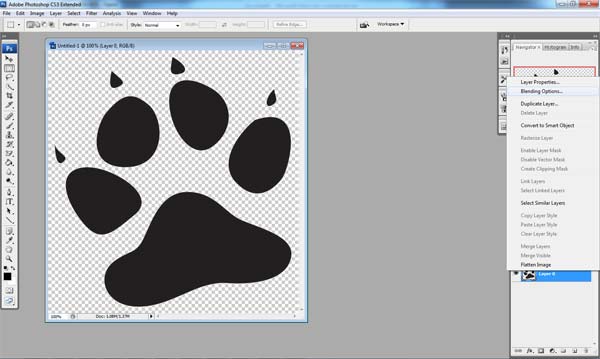
We are ready to add on the white border. Right click on your current layer, and then select “Blending Options…” In the window that appears, there should be a list of checkbox options.

At the bottom is an option entitled “Stroke.” That is the one we want: check the box. There is probably a red border around the image now. We will change that soon. If you select the “Stroke” option in the left hand column, a menu of options should appear to the right. We are going to first change the color to white. Click on the color palette, and then select the color white (top left hand of the color spectrum). If this border is at all grainy, and does not hug the black part of your symbol perfectly, you need to go back to the Magic Eraser step and increase the Tolerance. Too much off-white still remains on the symbol, and so the border is wrapping the black poorly (the off-white is getting in the way).
Otherwise, move on to adjusting the size of the stroke. The exact amount will depend on the size of your image. For one like mine, I adjusted the size to 10 pixels. Click “OK.”

The image is now ready. Save the image to the folder where you store your BANG! playing card images.
STEP 3: Place Expansion Image in your Cards as your Design Program Dictates.
No comments:
Post a Comment