Tuesday, August 30, 2011

Character Guide: Lee Van Kliff

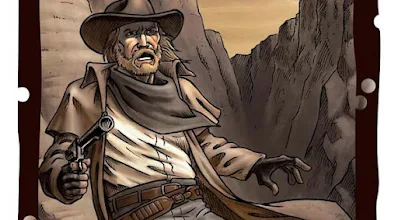
Lee Van Kliff BANG! card game character

Character Name
: Lee Van Kliff.

Inspired by: Lee Van Cleef, who played in numerous villian roles in Western films, such as the Bad in The Good, the Bad, and the Ugly. 

Life Points: 4. 

Ability Type: Offensive. 

Ability: "During his turn, he may discard a BANG! to repeat the effect of a brown-bordered card he just played." 

Activation: After he has played a brown card during the playing phase of his turn. 

Cards enhanced by Lee Van Kliff's ability: BANG!, Indians!, Springfield, Punch, Gatling, Duel, Beer, Whisky, Tequila, Saloon, Cat Balou, Brawl, Panic!, Rag Time, Stagecoach, Wells Fargo, and General Store. 

Good roles for Lee Van Kliff: Outlaw, Deputy, Renegade. 

Characters that counter Lee Van Kliff well: Slab the Killer (his attacks are very difficult for Lee Van Kliff to defend, and he doesn't want to store 2 Missed! in his hand anyway), Willy the Kid (Willy the Kid's strong offense can be hard for Lee Van Kliff to respond to), Calamity Janet (her conversion ability allows her to avoid most of Lee Van Kliff's offensive combos), to some extent El Gringo (after taking a hit from his brown card, he has a good chance of stealing the BANG! required for replication from Lee Van Kliff's hand), Jesse Jones (he can steal BANG! from his hand), Belle Star (Lee Van Kliff's defensive cards in play will do him no good against her, and he cannot replicate his cards out of turn), at times Sean Mallory (when he has a good hand built up he can fend off Lee Van Kliff's attacks and fight back), somewhat Apache Kid (when Indians! or diamond BANG! are played against him they have no effect, and neither do their replications; however, a diamond BANG! may be used to replicate the effect of a non-diamond offensive card to hurt Apache Kid), and Flint Westwood (he can swap out a non-BANG! from his hand to hopefully steal BANG! and powerful brown cards Lee Van Kliff was hoping to replicate). 

Characters that Lee Van Kliff counters well: Elena Fuente (He can replicate the effects of Duel and Indians! against her, as well as hit her with devastating offensive combos), Gary Looter (Able to discard BANG! to replicate brown card effects makes it quite unlikely he will exceed his card limit), Big Spencer (his ability to almost always produce some sort of offensive combo makes it very unlikely that Big Spencer will be able to protect himself from his attacks). 

2-player value: Excellent. While he can no longer gain more life points by replicating the effects of Beer, he should have a very strong offensive position. 

General Strategy as Lee Van Kliff: One of the most important things to remember about Lee Van Kliff is that discarding a BANG! does not replicate a card, but its effect. This means that the brown cards that require discarding another card to play them are much more powerful for Lee Van Kliff if he has a BANG! available. If he replicated the card, he would have to discard a card again. But since he replicates the effect, he gets the powerful effect at no extra cost! Thing of how powerful it is to Brawl, Rag Time, or Springfield twice in a row! Or how much health he can regain with a Whisky, or help another ally with a Tequila. Lee Van Kliff should never forget this. One other point on his replicating effects versus cards: if he plays a Wells Fargo or Stagecoach and replicates their effect, a new Wild West Show event card is not brought into play. This only occurs when cards are played, not their effects replicated (see Wild West Show FAQ Q19).

Next, Lee Van Kliff should be aware that he can use his ability as many times as he likes during his turn. No rules in Wild West Show or questions/answers in the FAQ preclude him from doing so. While using his ability more than once is dependent on having 4 brown cards in his hand that can be used during his turn (2 of which would have to be BANG!), this is a definite possibility. This is especially the case when Lee Van Kliff uses cards that allow him to draw more during his turn (besides the obvious ones, don't forget about Derringer or steal cards like Panic!, Conestoga, or Rag Time). Some of these like Wells Fargo and Stagecoach you will definitely want to replicate. The cards drawn will most likely allow you to use his replication ability again during the same turn. 

As a final clear up about his ability, when he replicates the effect of a card, he does not have to select the same target with the replication. Thus, I could play a Springfield against one player, and then replicate the Springfield's effect against another player. This is cleared up in the Wild West Show FAQ Q13. While it is tempting to come out at the beginning of the game with guns blazing, Lee Van Kliff needs to take things slowly if possible. He should not try to make any quick enemies, since his ability will not work in a defensive manner for the most part. He can only use his ability on his turn, and so this eliminates the ability to replicate the effects of out of turn cards like Missed! and Dodge. He can still use his ability to replicate the effects of life point modifiers on his turn, but he cannot use it to replicate last chance Beer (except in rare cases where a last chance Beer was played during Lee Van Kliff's own turn, say to deal with Dynamite or losing a Duel played on on his turn when he is at his last life point).

This means that Lee Van Kliff should use the early game to get some important defensive cards in play: defensive sight modifiers, a Barrel, and some defensive green cards. Besides providing defenses, they also keep him from maintaining cards in his hand that he cannot replicate (Missed!, Dodge), making room for more useful cards. Once those are in place, Lee Van Kliff should try to build up a powerful attack combo. He should try to pair the BANG! with other offensive cards, not wasting a replication on a BANG! unless necessary. Duels are poor choices to replicate as entering into Duels often requires discarding the BANG! he needs for replication. Indians! and Gatling are powerful cards to replicate, but he should remember that they affect his allies as well. Springfield is a beautiful card to replicate if his rival is out of range. Punch can be replicated if it is all you have left. Supplement your replication attacks with green offensive cards if possible. The target of your offensive combo should probably be the weakest link, especially if you are a Deputy or Renegade (or Sheriff), and have a good chance at scoring a card bonus for eliminating an Outlaw. You will probably be able to utilize those cards that turn. You will find that being able to discard BANG! will make it so that you rarely exceed your card limit. Anyway, when hitting your target, think of how your replication ability can be used to weaken his defenses. You can replicate Panic!, Rag Time, Brawl, and Rag Time against your target to remove defensive cards he has in play and that are in his hand. Combine that with an offensive combo and you are in business. When unable to eliminate an enemy, try to keep at least a BANG! in your hand by the end of your turn to protect yourself from Indians!. It is often worth taken the hit from a Duel, if you can afford it, so that you have BANG! ready in your hand.

Playing against Lee Van Kliff: Lee Van Kliff is a very powerful enemy. So powerful, in fact, that many other players—including his unknowing allies—will probably make some efforts to weaken him in the early game. Once it is ascertained which team (if any) he belongs to, there are a few strategies you can use to weaken him. First, remember that his ability only works on his turn. This means that Jail will nullify his ability for a round. It also means that his replicating ability will not work on defensive cards like Missed! or Dodge, and it will not work on out of turn last chance Beers. Of course, he can still use his ability to replicate the effect of Beer (or other life point modifiers) on his own turn. Nonetheless, Lee Van Kliff is more open to attacks than you might expect. He will try to compensate his weaker defensive state with either cards he has in play (Mustang, Barrel, etc.) or a really strong offensive stance. As long as you try to hit him hard, he will be hard pressed to always use his BANG! in offensive ways. Second, since his replication ability is dependent upon having BANG! in his hand to discard, you can weaken him by removing his BANG!. You can do so by playing Duel, Indians!, and stealing or discarding cards from his hand. Also pay attention to when BANG! appear due to a General Store; make efforts to keep him from getting it, as well as powerful brown cards that he could replicate with a BANG!.

General News Update (August 30, 2011)

I apologize that I have not posted on the blog lately with no word of explanation. I have had a wonderful event in my personal life: the birth of my first child, which is definitely (and rightfully) taking the majority of my attention. He is an awesome little guy, and I am a very proud dad (weird word to apply to myself still). However, I did want to post some updates:

Robbers' Roost: I have got Superior POD to commit to developing a color profile for the backs of the playing and character cards. I will mail my copies of cards for them to match this week. This should insure matches to the official card backs as best as possible. As for the custom cutting of the cards, I may have come up with a solution. I will try to front the cost for the cutting of 5 decks to lower the cost of the printing. You will upload the files for your personal copy as a "custom job," which will allow custom pricing to apply to your personal copy (it will add in your share of cutting the cards). Finally, I am trying to convince my sister to draw some awesome art for a tuck box for the expansion.

Death Mesa: Still working on the 12" x 18" French and Spanish translations, and I am working on 8.5" x 11" cardsheets for the Italian translation. A guidebook update should be underway sometime too.

Modding Tools: I am hoping someone will convert the IDML file of the BANG! Master Template for InDesign CS3 using InDesign CS4. Besides this, I have been working on a spreadsheet presenting a detailed analysis of the playing cards used in BANG!, Dodge City, and Robbers' Roost. Should be useful for modders.

Miscellaneous: I am still trying to finish up character guides and card explanations. Lee Van Kliff was put up today as a witness of this.

Wednesday, August 24, 2011

Tutorial: How to Make BANG! Character Cards (Part 2)

News (9/12/11): Added in the missing step for adding in the bullet images for 3/4 life point characters.
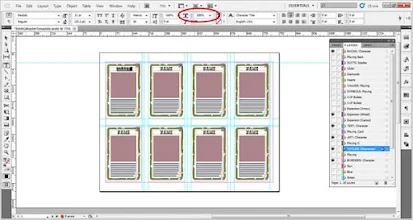
With the release of the BANG! Master Template (available for InDesign CS4-CS5), I have wanted to create tutorials that show how to use it. This guide will use the BANG! Master Template, and finish up on the first part of a tutorial that teaches how to make custom BANG! characters. Thus, before reading this tutorial, I recommend you first read the tutorials on how to create and balance a character ability, and how to create a character card image (the first part of this tutorial). STEP 1: Open up InDesign and load the BANG! Master Template. I am acting under the assumption that you have downloaded the BANG! Master Template and that you have not made any changes to it. If not, download the template or start with a blank template. Once you have loaded the file, it should look like this (at least in CS5).
STEP 2: Prep the Template for Character Cards. Make sure the Layers window is open. You should see a list of 28 layers. You should notice which layers are visible due to the eyes being present at the boxes to the far left of the layers. Scroll to the bottom. We are going to prep this character card sheet from the bottom up, making the necessarily layers visible and unnecessary ones invisible. Let's do it in this order:
  1. Turn off the "Brown" layer by clicking on the eye corresponding to that layer.
  2. Turn on the "BORDERS: Character" layer by clicking on the far left box of that layer. An eye will appear, as well as the character border.
  3. Turn off the "Playing" layer.
  4. Turn on the "TITLES: Character" layer.
  5. Turn off the "Playing C" layer.
  6. Turn on the "ART: Character" layer.
  7. Turn off the "Playing Card" layer.
  8. Turn on the "TEXT: Character" layer.
  9. Turn off the "VALUES: Playing," "Hearts," and "Playing Back" layers.
  10. Turn on the "BACKS: Character" layer.
The end result (of the fronts) should be as below.
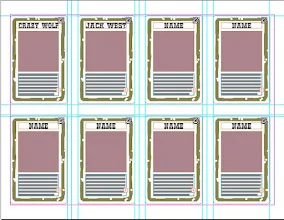
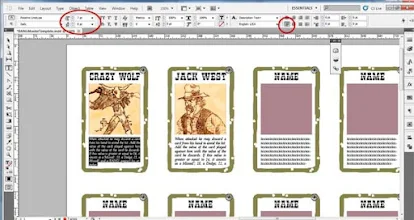
STEP 3: Add Character Name(s). Using the Selection Tool (the black looking arrow in the toolbox, shortcut "V"), double-click inside one of the text boxes entitled "NAME." Then, select all of the text (shortcut CTRL+A), and type in the name of your character. NOTE: This you should have picked out earlier; I have tips for this in step 1 of the first part of this tutorial. If the name is too long for the text box, we will have to scrunch the text. In my example, where I am trying to input "Crazy Wolf" as the name, this is the case. To scrunch the text, select all of the text in the name (CTRL+A inside the textbox again). Then, notice the long horizontal toolbar across the screen, showing typing tool options. We want to adjust the "Horizontal Scale" of the text. The option for doing this is identified by the stretched out T icon.
We want to change the value in the input box to the right. Its default value is 100%. Since our text is too long, we will want to lower that value. Click once in that text box, and then use the down arrow on your keypad to decrease its value until it fits snugly in the text box. For Crazy Wolf, I just had to adjust the Horizontal Scale to 97%. It is also possible that your name is too short (as in the case of a name like "Jack West"). The names for characters in BANG! are stretched to fit the width of the character art images, unlike the playing cards. To stretch the names, we will again use the Horizontal Scale. Instead of decreasing its value, we will increase the value. Select inside the input box with your cursor and then use the up arrow on your keypad to increase the value. For Jack West, I had to adjust the Horizontal Scale to 108% to fill the text box. The end results look like this.
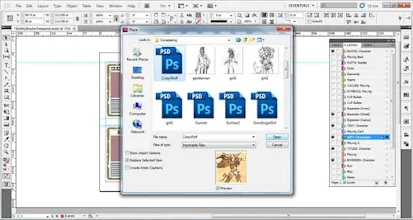
If you have more than 1 character, keep adding in names into the text boxes entitled "NAME," and adjusting the Horizontal Scales on them as needed. STEP 4: Add in Character Images. Using the Selection Tool, select one of the lavender squares undernearth one of the character cards you have named. We are now going to place in the image you created for this character card in the previous part of this tutorial. With the lavender square selected, either select from the top menu File -> Place... or use shortcut CTRL+D.
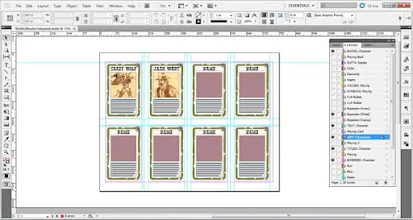
A window will appear allowing you to select an image to insert. Locate the image, select it, and then click on the highlighted "Open" button. The chosen image should replace the lavender box, but maintain its dimensions. If the image does not look proportional, then select the image and then use shortcut ALT+SHIFT+CTRL+E. This should fit the content of the image proportionally to the frame. If it still looks off, then your imported image was not square. Either fiddle with it to your liking, or edit the image in Photoshop, so that it is a square. The end results show be like this.
If you have more than 1 character, select on the next lavender box where you want to add a character image, and use the place function to add it in. Adjust the image as necessary. STEP 5: Add in Character Ability Text. Using the Selection Tool, double-click inside one of the text boxes with the long string "textextextext...." underneath one of the character cards you have named and provided an image for. Select all of the text in the box (CTRL+A), and delete it. Then replace it with the text for your character ability, which you might have designed in conjunction with this tutorial.
Next, justify the text with the last line aligned left. Do this by selecting all of the text (CTRL+A) and then clicking on the appropriate justification icon. You should notice 8 text orientation icons available amongst the long horizontal bar displaying typing tool options. You will want to click on the one in the bottom left. Afterwards, turn off the hyphenation if that is a problem. Go to Window -> Type & Tables -> Paragraph. A window should appear. In the bottom left there is a check box for hyphenation. Make sure it is empty to disable hyphenation. If the text is too long, your options are:
  1. Trim the text by getting rid of superfluous words and rephrasing statements in shorter ways.
  2. Adjust the font size. Select all of the text in the textbox (CTRL+A), and then adjust the size by clicking inside the input box for font size. This is in the tool options horizontal bar for the Typing Tool. It is identified by the small T, big T icon. Its default value should be 8. Change this to 7. Directly below that input box is an input box that alters the leading in between lines. Its default value is 9. Change that to 8. If your text still doesn't fit, consider:
  3. Extending the border of the text box a little further down. Click on the bottom border and extend it. If that doesn't work, perhaps:
  4. Make the ability simpler so that it is not as convoluted to explain.
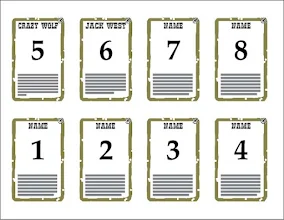
Add in any remaining text for other characters. STEP 6: Add your Expansion Icon. By default the wagon wheel icon is in place. Feel free to use this icon as your custom expansion symbol. If you prefer another, I have provided both a cactus icon and a bow and arrow icon. Any of these icons can be swapped out by going to the layers menu, and turning on the "Expansion" layer you like. Turn off the "Expansion" layers you do not like. You may wish to make your own. If so, follow my tutorial on making your own BANG! expansion icon. If you have the icon ready, go to the layers window and select one of the "Expansion" layers, or create a new layer just below those layers. Either way, with an appropriate layer selected, place (CTRL+D) your custom expansion icon into it. Use the already provided expansion icons as guides for where to place your custom icon. If your icon is too large, simply adjust the image frame so the it is the same size as one of the provided expansion icons. Then use shortcut CTRL+ALT+SHIFT+E to resize the custom icon proportionately to the frame. Feel free to fiddle with the image frame and resizing until you get it towards something you like. If you have more than 1 card, simply copy the custom icon (select it and use shortcut CTRL+C) and paste (CTRL+V) a new one. Then move it over to the next card and put it in the appropriate place. STEP 7: Add in Life Point Bullets. For each of your characters, you should decide whether they merit having 3 or 4 life points. Typically, very powerful abilities merit 3 life points, while weaker abilities merit 4. Once this has been decided, you can add in the life point bullets by using the "3 LP Bullets" and "4 LP Bullets" layers. First, turn on the "3 LP Bullets" layer. This should make images of 3 bullets appear on each card. We only want those images to appear on the character cards that need it. To remove the others, we need to make the individual images identifiable. Do so by clicking on the right facing arrow next to the "3 LP Bullets" label in the Layers menu. This will reveal a list of 8 elements, each entitled "Bul" with a numerical ending. The number at the end of the element describes the card that it corresponds to. The guide for the numbering is provided in the image for step 8. Turn off all elements that do not correspond to a character card that has 3 LPs. In my example, only Crazy Wolf is a 3 LP character, so I will only keep the element "Bul5" visible.
Now, for the 4 LP characters if you have any. Turn on the "4 LP Bullets" label, which will make 4 bullet images appear over all of the cards. You will notice that these cover up all of the 3 bullet images that were there previously. We will need to turn off all of the elements that do not correspond to 4 LP characters. Do so in a similar manner as we did for the 3 LP images. In my example, only Jack West is a 4 LP character, so I will only keep the element "Bul6" visible. The end result is this:
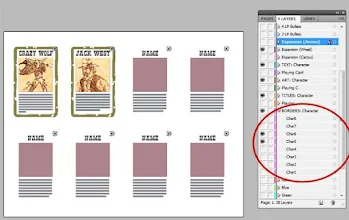
OPTIONAL STEP 8: Turn Off Unused Material. You may not fill up an entire card sheet with characters and that is fine. For printing purposes, you will not want superfluous images and texts being printed, and so we should make that stuff invisible. Let us start with the borders. In the layers window, look for the layer entitled "BORDERS: Character." There should be a right-faced arrow to the immediate left of the text label. Click on the arrow to have various layer elements appear. Each of the elements should be labeled "Char" with a 1 through 8 tacked on at the end. These numbers correspond to the 8 cards, as identified in this image:
We will want to turn off all the elements named "Char" that correspond to the unused card numbers. So, in my example I want only "Char5" and "Char6" visible. The rest I should turn off. The result is this:
A similar numbering system is present in most, but not all layers. Text elements to be disabled in all layers are easily identified, since the elements all have the default names ("NAME" or "textextext..."). Turn off all of those superfluous text elements in "TITLES: Character" and "TEXT: Character." In the "ART: Character" layer, turn off all elements with the "" value. Turn off unnecessary expansion icons in your "Expansion" layer (or custom layer). All that is left is the "BACKS: Character" layer. Scroll down to the next page. Display the layer elements for "BACKS: Character" in the Layers window. While the elements have the familiar numbering system, they correspond to the backs in an inverse way as shown below:
This is needed for making sure the cards print the backs correctly on the right fronts. Just make sure the #s on the fronts you kept visible (in my example, "Char5" and "Char6" were visible) are the same ones kept visible on the backs (thus, only "CharBack 5" and "CharBack 6" should be visible). The result is:
Your card sheet should now have all superfluous material removed. STEP 9: Export your Card Sheet to PDF. Now that your card sheet's design is complete, export it to PDF. Do this by selecting File -> Export... from the top menu, or by using shortcut CTRL+E. A window will appear, where you must specify a name and location for the exported file. Click save. An "Export Adobe PDF" window should appear. Make sure the radio button "All" is selected for Pages. Under the Options area, select "Visible Layers" from the Export Layers dropdown menu. Also check the "View PDF after Exporting" box. We will now need to go to the "Compression" section. Select that label from the lefthand column.
Make sure that in the Color Images and Grayscale Images ections that the downsampling is specified as bicubic to 300 ppi for images above 300 ppi (pixels per inch). Then click on the blue highlighted "Export" button.
When it is done exporting, the PDF file should appear. Your character card sheet is now complete and ready to be printed off. If you wish to keep the design file (recommended), go back to InDesign and save the character card sheet InDesign file under a new name. This way you will have the design file for the characters if you want to make any adjustments in the future, and you will also have a clean Template to make more cards with in the future.

Tuesday, August 23, 2011

Tutorial: Design an Expansion Symbol for BANG! Cards

As new BANG! modders add their own playing and character cards to the game, they will often want to place a symbol in the top right of their cards to distinguish them. The BANG! Master Template provides 3 symbols for use: a cactus, a wagon wheel, and a bow and arrow. However, if you wish to make your own expansion symbol, let me show you here.

STEP 1: Find a simple, unique western-themed symbol.

This first step is quite easy. Your task is to find a symbol that is not already used in BANG! (and hopefully other unofficial expansions). This includes:
  • Buffalo (Dodge City)
  • Man on Horse (Wild West Show)
  • Pistol (Bullet characters)
  • Ox Skull (Robbers’ Roost)
  • Horseshoe (Robbers’ Roost)
  • Vulture (Valley of Shadows)
  • Film Camera (Directors’ Cuts)
  • Cactus (already in BANG! Master Template)
  • Wagon Wheel (already in BANG! Master Template)
  • Bow and Arrow (already in BANG! Master Template)

What are some ideas for other symbols? Here are some suggestions: the cowboy neckerchief, a teepee, dynamite, a scalping knife, a lariat, a windmill, a tombstone, a bag of money, a paw print, and a train. For my example, I will use a paw print.

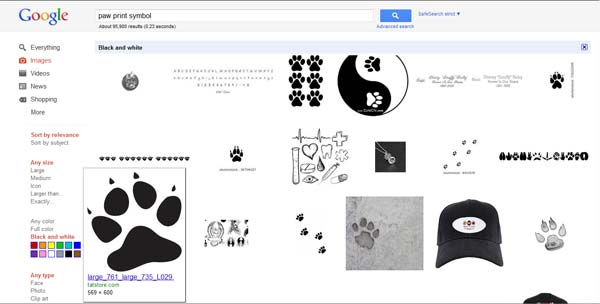
To find an image, I recommend using an image search engine (Google Image Search works just fine). Type in the name of the icon you are looking for, and then add something like “symbol” on the end.

Google Search Query


Thus, I inputted “paw print symbol” into the textbox. Click on “Search Images.”

Black and White select


You are going to get tons of results. To narrow your results, and get more what you want, select “Black and White” from the list of color options in the left hand column. All expansion symbols are black and white, so this should simplify both finding an image and readying it to place on your BANG! cards.

Scroll through the results until you find something that strikes your fancy.

Image Choice


I settled on this image. Generally, you will want an image that has some size, at least 150 pixels+, but it doesn’t have to be too big, as the symbol is small on the card. Once you have made your selection, click on the image. A small preview image should pop up. You can either copy the preview image if it is high enough quality or click on “Full-size Image” in the right hand column. Copy the image.

Copy Image


STEP 2: Prepping the Image.

Paste Image


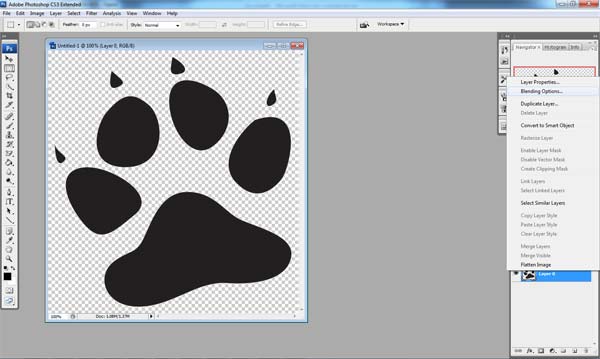
Open up Photoshop. Create a New Image, and it should already have the correct dimensions for the copied image set up. Paste the image.Then we are going to need to flatten the pasted image. You can do this by either right clicking on a layer in the layers window and selecting “Flatten Image,” or using the main menu, select Layer -> Flatten Image.

Erase Background


Now, we need to erase the white background. The BANG! expansion symbols have a white border around them, but it is not a big white square block! Select the Magic Eraser tool. Once you have it selected, let us get some of the perimeters set up. First, we want to make sure we erase anything close to white, so let us set the tolerance to “30.” Second, let’s check off both Anti-Alias and Contiguous. Now we only have to select 1 white patch to grab everything else. Feel free to click on a white area. You should now have a transparent area wherever white was before. If not, use the magic eraser on any remaining white areas.

Adjust Canvas Size


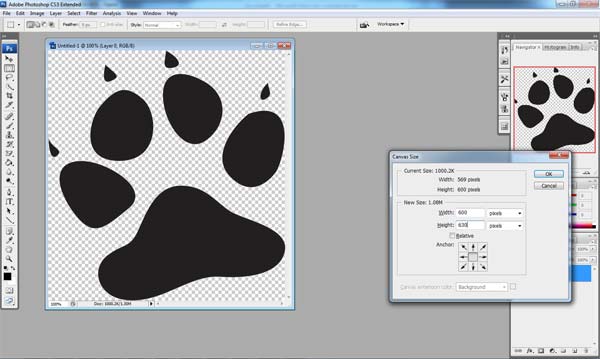
Next, we want to make sure that there is room for a white border to go around the symbol. Often, as is the case in my paw print example, some of the black part of the symbol goes to the edge of the canvas. No good—we will need to adjust the Canvas Size. You can adjust the canvas size by selecting Image -> Canvas Size from the menu, or by using shortcut CTRL-ALT-C. Make sure that there is at least a 10 pixel buffer between the edge of your symbol and the edge of the canvas. I gave a 15 pixel buffer in my example.

Blending Options


We are ready to add on the white border. Right click on your current layer, and then select “Blending Options…” In the window that appears, there should be a list of checkbox options.

Stroke Settings


At the bottom is an option entitled “Stroke.” That is the one we want: check the box. There is probably a red border around the image now. We will change that soon. If you select the “Stroke” option in the left hand column, a menu of options should appear to the right. We are going to first change the color to white. Click on the color palette, and then select the color white (top left hand of the color spectrum). If this border is at all grainy, and does not hug the black part of your symbol perfectly, you need to go back to the Magic Eraser step and increase the Tolerance. Too much off-white still remains on the symbol, and so the border is wrapping the black poorly (the off-white is getting in the way).

Otherwise, move on to adjusting the size of the stroke. The exact amount will depend on the size of your image. For one like mine, I adjusted the size to 10 pixels. Click “OK.”


The image is now ready. Save the image to the folder where you store your BANG! playing card images.

STEP 3: Place Expansion Image in your Cards as your Design Program Dictates.

A Fistful of Cards: Designer's Notes

A Fistful of Cards BANG! Prototype

This is the next in a series of articles on the development of BANG!. The expansion "A Fistful of Cards" was developed in response to both the success of the High Noon expansion and a desire to put something special together for the 2005 edition of BANG!. DaVinci games and its international partners decided to include the BANG! community on this one, soliciting proposals for new event cards in the vein of High Noon. After over 500 proposals came in, it was up to Emiliano Sciarra (the designer of BANG!) to pick which event cards were to be a part of the expansion. He was supposed to pick at least 1 card from each country where one of DaVinci's international business partners resided.

Sciarra recalled that the process of finishing A Fistful of Cards on time was laborious. The selection process was fun. While some cards, such as Ambush, were submitted multiple times, others such as Dead Man or Vendetta quite surprised him. However, testing and writing careful text for each of the event cards (so as to avoid loopholes) was quite difficult. Sciarra believed the expansion had overall a mixed result: some cards were fun, brutal, and others unbalanced. The last card in particular was brutal, but provided the internal clock for BANG! that Sciarra had wanted.

For the full article (Italian only), visit the article at Sciarra's homepage.

Friday, August 19, 2011

BANG! Community: Forum and Links


One of my goals in the BANG! Blog is to enhance and support the BANG! community. Thus, I have made efforts to provide both modding tools and tutorials to help modders create their own fan expansions. I have been working diligently to translate my projects (like Death Mesa) into other languages. On the blog I have made comments open on almost all posts, and tried to give thorough responses. Eventually, I hope to perhaps organize online games (and perhaps even tournaments) when the BANG! Video Game comes out of multiplayer beta.

BANG! Blog Forum. To further help with community interaction, I have created an online forum. Here, questions can be posted on Death Mesa, Robbers' Roost, BANG! Strategy, BANG! Modding, and suggestions can be given for the site. Miscellaneous topics are posted, ranging from sharing new variants, discussing how to balance characters, exploring production issues, and so forth. I hope this will be a useful resource for you.

Links. While I hope to make the BANG! Blog your #1 BANG! resource, there are other sites on the web that provide valuable files, modding tools and expansions, answers to questions, and so forth, that are worth checking out. Check out the list I compiled below with a descriptions of their assets.
  • BANG! on Board Game Geek. This site provides a large amount of resources. This includes technical information about the game, creative images, player aids, a collection of reviews, custom expansions (old), rules translations, links, and video. In the end, however, the great thing about BGG is the forums, and the conversations available there.
  • Emiliano Sciarra's Site. Sciarra, BANG!'s designer, has a site that provides a lot of information about BANG!: technical card by card information, the development and history of the game and its expansions, FAQs, some strategy suggestions, and other information. I noticed on 9/29/2020 that many of the links in his site are now defunct -- I hope they are fixed soon. I appreciate Emiliano for including a link to the BANG! Blog on his site.
  • dV-Giochi. The main publisher and rights holder to BANG!. This site provides rules and FAQ downloads, card visualizations and useful card lists, and BANG! news. I can no longer find the forums. As with the BANG! card game itself, there is a mix of Italian and English here. So use your Google Translate where necessary. Finally, I believe the dV-Giochi site is the only place where you can purchase blank character and playing cards at the moment. Unfortunately, international shipping of the cards is still astronomical.
  • Edge Entertainment. The Spanish publisher to BANG!. This slick-looking site provides a few downloads, but it is mostly the very active forums that make this site a great place to visit. Besides getting answers to rules, there are many great and skilled modders at work at Edge Ent.
  • BANG! Directors' Cuts. Home of a new Spanish unofficial expansion to BANG! designed by Django. I have been working with him on an English translation. The site explains both the rules to BANG!, and gives a detailed presentation and discussion of the cards added in the custom expansion. Also included are some shots of physically produced copies.
  • BANG.cz. Probably the oldest of the BANG! fan sites. It is a Czech-English site, with some impressive offerings, such as creating the original El Dorado expansion. I updated and translated this expansion into English. Martin Blasko, the designer of the Valley of Shadows expansion, operates from this site. Bang.cz offers the BANG! Card Generator, which allows modders to quickly design custom cards. Due to its significant limitations, I depricate its use for the serious modder (try out the BANG! Master Template instead), but it will still be very useful for the casual one because of its speed. Besides this, bang.cz provides some excellent downloads of rules, FAQs, custom expansions, and so forth. It also has some active forums, but these are pretty Czech-exclusive. An English post occurs probably once every month or two.
  • BANG! Video Game. Official site of the BANG! cross-platform video game, developed by Palzoun and Spinvector. It provides some news, trailers, faqs and most importantly provides a place to purchase the video game.
  • BANG! on Ultra Board Games. This has a decent collection of rules and card descriptions for the BANG! card game. There are some nice visuals here to help with learning the game.
  • BANG! on Wikipedia. Last, and also least, is the Wikipedia page for BANG!. While the link is for the English page, there are also pages in Italian, French, Spanish, German, and Czech. Speaking of the content on the English page, it provides general information on the rules (inc. tournament), cards, characters, and strategy of BANG!. This is followed by a description of official and unofficial expansions to BANG!, and some notes on the BANG! video game.

Thursday, August 18, 2011

Valley of Shadows: New Czech Expansion for BANG!

BANG! Valley of Shadows Promo Card

News (11/20/11): Revised the translations of the cards with Martin Blasko's help. See the changes and clarifications in the translation below.
Martin Blasko, with Dv-Giochi's blessing, has finished a Czech expansion to BANG! with their local publisher ALBI. It is only out in Europe (in Czech only), and no shipping is provided by the publisher to the United States. However, I have been working with Blasko to have decks shipped to the United States. If you have any interest in a copy, e-mail me and I will try to work something out. I have worked with Blasko to provide an English translation of Valley of Shadows. The expansion does not add any new mechanics to the game; all cards are the typical blue, brown, and character cards. There will not be any new green cards. Here are 2 examples of how the cards look in Czech.
BANG! Valley of Shadows Ghost and Escape Cards

I will be providing a translation that can easily be printed over stickers to be applied to the czech titles and text. Instead of stickers, you could also print the translation off on paper and lay it over the cards in card sleeves (or tape the paper cut-outs to the cards; not an optimal choice for shuffling). Characters:
  1. Mick Defender (4 LP): When Mick is the sole target of any card besides BANG!, he may play a Missed! to avoid that card's effect. NOTE: This would apply to Knife, Punch, Buffalo Rifle, Springfield, Derringer, Pepperbox, Panic!, Cat Balou, Duel, Rag Time, Conestoga, Can Can, Bounty, and Prison.
  2. Evelyn The Bang (4 LP): This one is hard to understand. Apparently, During her drawing phase, she may draw 1 less card to Punch. Punch, of course, means she is banging! a player seen at distance 1.
  3. Henry Block (4 LP): Anytime a player discards or steals a card Henry has in play or in his hand, Henry fires a BANG! at that player. NOTE: Blasko specifies that this BANG! does interact with abilities, cards in play, etc.
  4. Lemonade Jim (4 LP): Each time another player plays a Beer, Lemonade Jim may discard a card to regain 1 life point.
  5. Colorado Bill (4 LP): Anytime a player avoids his BANG!, Colorado may "draw!" On spades, his target immediately loses a life point.
Brown Cards:
  1. Spray: BANG! both a player of your choice and a player adjacent to him.
  2. Wild Bunch: All other players must discard a BANG! or lose 2 cards from their hands, their choice.
  3. Last Beer: Regain 1 life point. NOTE: What makes this card different from a normal Beer is that it can be played when only 2 players remain.
  4. Tornado: Each player must set aside 2 cards from his hand and pass them to the player to his left. NOTE: The passing is done simultaneously.
  5. Return Fire: 1st Effect: Missed!. 2nd Effect: Your attacker is the target of a BANG!
  6. Tomahawk: Bang! a player seen within distance 2.
  7. Poker: All other players must discard a card if they can. If none of those cards is an Ace, you may draw up to 3 of the discarded cards.
  8. Escape: When you are the sole target of any card besides BANG!, play Escape to avoid that card's effect. NOTE: It is essentially like Mick Defender's ability above.
  9. Twin Shot: Play with a BANG!. If your target does not evade that BANG! he loses 2 life points.
  10. Saved!: Play out of turn to prevent any player from losing a life point. If this saves another player from elimination, draw 2 cards from his hand.
Blue Cards:
  1. Ghost: Play in front of an eliminated player. That player returns to life without a character ability and no way to gain or lose life points. Besides this he plays as a normal player. NOTE: elimination would occur when the Ghost card is discarded or stolen from him.
  2. Shotgun (Gun, Distance 1): Whenever you hit a player with a BANG!, that player must discard a card of his choice from his hand, if possible.
  3. Machete (Weapon, Distance 1): During your turn, you may play any card except Missed! as a BANG!.
  4. Bounty: Play in front of a player. If he is hit by a BANG!, his attacker draws a card.
  5. Rattlesnake: Play in front of a player. At the beginning of his turn, that player "draws!" On spades, he loses a life point. Otherwise, he passes the Rattlesnake to his left.
Well, those are the cards included in Valley of Shadows. 3 of the 5 characters are defensive; 2 offensive. They look far less OP than the Wild West Show characters, which is encouraging. The playing cards, on the whole, are quite offensive, and should lead to more devastating attacks that will favor the more offensive characters and roles in my opinion. It will be interesting to see how many of the cards from the base game will be added to balance out these cards. Anyway, I will keep you posted on any new information on this foreign official expansion!

Tuesday, August 16, 2011

Boot Hill Characters


While posting on the design of the Dodge City expansion to BANG!, I noted how some of the early characters in the draft were axed. I speculated that this probably included the Boot Hill characters. Some have asked regarding the Boot Hill characters, and I thought I would share them in more detail here. Feel free to check out the larger image above for a more close up look on the characters.
  1. Judge Dread (4 LPs): At the end of his turn, if he had less than 2 cards in hand, he drew 1 card.

  2. Juan Miranda (4 LPs): Each time he was hit, he could "draw!": on Hearts or Diamonds, the character who hit him had to play a Missed! card or lose 1 life point.

  3. Dynamite Dick (4 LPs): He was unaffected by the Dynamite. During his turn, he could draw the Dynamite from the discard deck.

  4. Dalton Gang (3 LPs): They might hold in their hand twice the normal allowed number of cards, and they began with 6 cards in hand.

  5. July Ann Winslow (4 LPs): In her turn, she drew until she had up to 4 cards in her hand.

  6. Heremy Baile (3 LPs): Each time a player drew a card from his hand or in play in front of Jeremy, that player had to lose 1 life point.

  7. Will Penny (4 LPs): Each time he was about to lose a card from the hand or in play in front of him, he could choose which card to lose.

  8. Tharley Callum (4 LPs): In her turn, she could see the cards in the hand of any one player.

  9. Captain Barrett (2 LPs): At the beginning of the Sheriff's turn, he drew 2 cards from the deck.

  10. Matthew Hazard (4 LPs): Instead of "draw!", he could discard a card from his hand nad use it as the result of the "draw!".

BANG! modders and character designers have reintroduced these characters intentionally and unintentionally. While making this post, I was surprised to see how similar Will Penny's and Juan Miranda's abilities were to ones I thought of for the new Jack West. Anyway, I hope these eliminated character ideas will provide you with some food for thought in character design.